
(About a 5-minute read and a 3-minute video.)
(Important Note from Chris: I really wanted to get this idea out into the wild so we can experiment and refine the rules - so lets develop it together. Please leave your ideas in the Comments. Thanks!)
Here's a little twist on the classic, Stepping Stones (Karl Rohnke, The Bottomless Bag 1991 and then in Quicksilver 1995). Below is the first (1991) write-up from Karl (exactly as written - only 1/3 of a page):
Divide your group into smaller groups of five. Each group is given 4 rubber (plastic) gym markers and asked to physically cross the width of a basketball court as quickly (timed) as possible. Allow 2-3 minutes of planning time before the start.
Rules (1991):
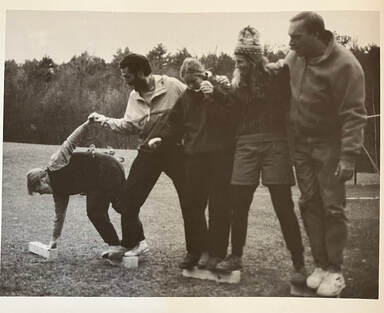
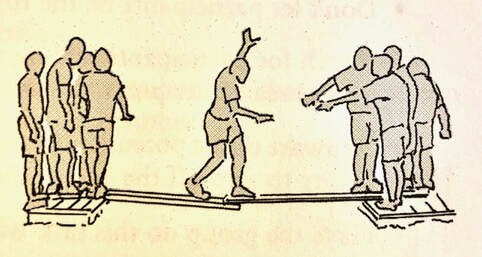
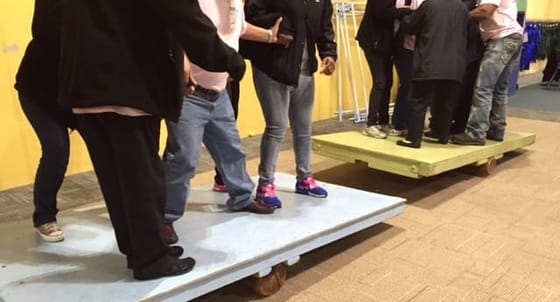
In 1995, Karl noted, "This seemingly simple activity is fast becoming one of my favorites." In this updated description of Stepping Stones he included some choices for "Stuff You'll Need" like 12-inch square "rug pads" [carpet squares], "rubber deck spots" (from the Project Adventure Store), or "(12) 18-inch lengths of 4-inch by 4-inch lumber." Here's a picture from Quicksilver using the 4 by 4s [today, some consider the 4 by 4s too risky - 'rolling' potential]:
Divide your group into smaller groups of five. Each group is given 4 rubber (plastic) gym markers and asked to physically cross the width of a basketball court as quickly (timed) as possible. Allow 2-3 minutes of planning time before the start.
Rules (1991):
- Only the markers can be stepped on.
- No one may touch the gym spots with their heels - ball of the foot only.
- If someone inadvertently touches the floor, he/she must also return to the start, and anyone touching them must also return.
- Try to emphasize efficiency and group cooperation in your debriefing.
- Try different combinations of gym sports and group sizes.
In 1995, Karl noted, "This seemingly simple activity is fast becoming one of my favorites." In this updated description of Stepping Stones he included some choices for "Stuff You'll Need" like 12-inch square "rug pads" [carpet squares], "rubber deck spots" (from the Project Adventure Store), or "(12) 18-inch lengths of 4-inch by 4-inch lumber." Here's a picture from Quicksilver using the 4 by 4s [today, some consider the 4 by 4s too risky - 'rolling' potential]:
Rules (1995):
[There is a full page description in Quicksilver of Karl's "fun way" to frame Stepping Stones using intergalactic travel starting from planet "Lrak-Dna-Evets" (a little word play here you might recognize if you've followed Karl's work).]
- Anyone touching the ground between the boundaries must return to the start.
- Stepping stones must be touched at all times while in-between the boundaries - if a stepping stone is untouched "even for an instant" it is removed from play.
- Stepping stones may only move in the forward direction [eliminating the "rescue" of players required to return to the beginning after a touch]. Or, use this Rule: Stepping stones can only completely cross the boundary area one time.
- Boundaries: "Generally, it makes sense to set the boundaries far enough apart so that the group will need to recycle some of their props in order to cross the gap."
[There is a full page description in Quicksilver of Karl's "fun way" to frame Stepping Stones using intergalactic travel starting from planet "Lrak-Dna-Evets" (a little word play here you might recognize if you've followed Karl's work).]
Stepping Words
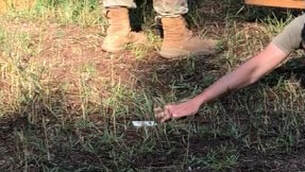
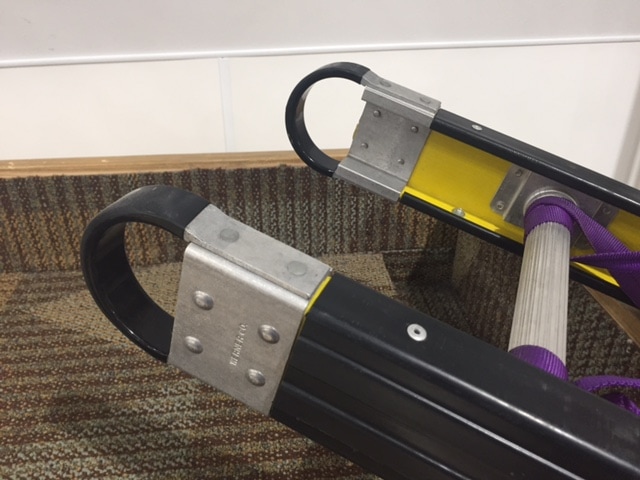
I used Stepping Stones a lot over the years. My go-to prop was 12-inch long 2-inch by 6-inch boards - starting out with one board per person. As boards were lost (untouched), the challenge for the group increased. It is a good, easy-to-lead challenge. [NOTE: We can put letters on these boards as well, but we might need some other Rules?]
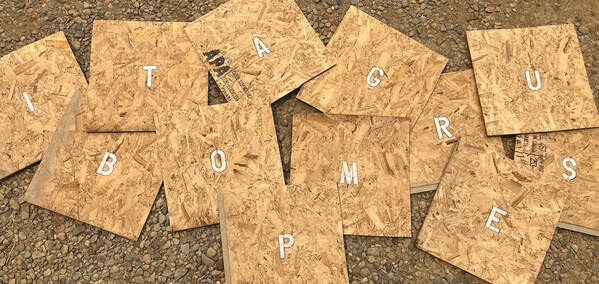
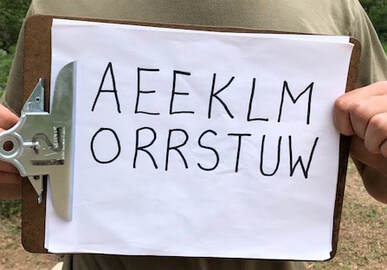
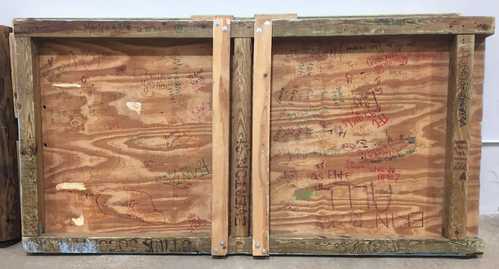
Recently I was asked to make some larger Stepping Stones to make it a little easier for some of our camper groups to accomplish the task (the 4 by 4s we have can limit success). Once we cut the 16-inch by 16-inch by 1/2-inch particle board, I took some time to think about adding another (less physical) 'problem' to solve as a variation. The 'board tiles' got me to think 'word tiles' and Stepping Words emerged. Here is the original set of 12 board-tiles:
I used Stepping Stones a lot over the years. My go-to prop was 12-inch long 2-inch by 6-inch boards - starting out with one board per person. As boards were lost (untouched), the challenge for the group increased. It is a good, easy-to-lead challenge. [NOTE: We can put letters on these boards as well, but we might need some other Rules?]
Recently I was asked to make some larger Stepping Stones to make it a little easier for some of our camper groups to accomplish the task (the 4 by 4s we have can limit success). Once we cut the 16-inch by 16-inch by 1/2-inch particle board, I took some time to think about adding another (less physical) 'problem' to solve as a variation. The 'board tiles' got me to think 'word tiles' and Stepping Words emerged. Here is the original set of 12 board-tiles:
|
After some figuring, these 12 letters can get us 17 letters. The 'I' can be a lower case 'L'. The 'U' can be a 'C' and a lower case 'n'. The 'W' can be an 'M'. and the 'P' can be a lower case 'd' (when thinking 'out-of-the-box' as we like to encourage).
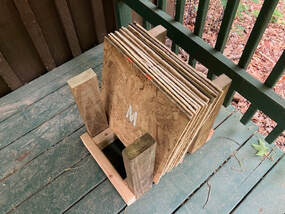
I stenciled the letters and then outlined them with a permanent marker to make them stand out a bit more. Then I had a colleague build us a tile-holder for easy storage. |
|
So, let's Play!
Rules (2023):
I led Stepping Words during our recent camp staff training for the first time with two groups and here are the Rules we plan to use/try over the summer with our campers:
Rules (2023):
I led Stepping Words during our recent camp staff training for the first time with two groups and here are the Rules we plan to use/try over the summer with our campers:
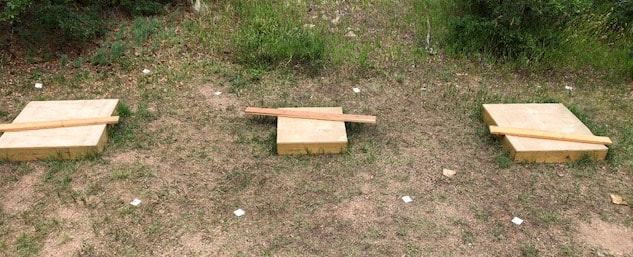
- Boundary Area: 50-feet across from Start to Finish (we're using lengths of webbing as the banks of our Lava River).
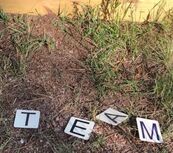
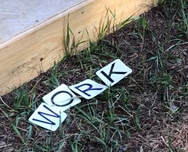
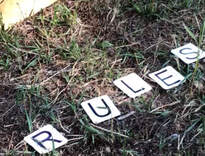
- Spell words to move across the 'Lava River' (we have a "Prehistoric" Theme at camp this year - hence the Lava).
- Words can be 2 to 5 letters long. [We didn't limit length at first and it was too easy to cross using longer words - not enough interaction.]
- Words must be placed alternating between "UP" and "CROSS" directions - UP words go towards the Finish line and CROSS words go parallel to the finish line.
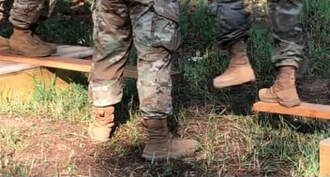
- As letters are placed, they must be stepped on to keep from floating away (being taken away). We will give our campers a '1-second' grace period to step on a board-tile.
- If a player places a board-tile they are 'bound' to this tile. Example: If I place the 'W' tile, I am now responsible for the 'W' - I keep possession of this tile throughout the journey. [NOTE: I'm not sure how this Rule will play out - we're going to try it.]
- Players can be bound to two tiles as long as they are touching them in some way.
- Once a word is in place - fully spelled - and players are stepping on all letters, the word can be disassembled so letters can be used in other words during travel.
- No jumping from tile to tile - one foot on a tile at all times between the boundary lines.
- If a player touches the Lava (ground) they must return to the Starting shore for 'first aide' before beginning again. Remember: Returning players can only enter the boundary area onto a word of 2 to 5 letters.
Ready? Go!
Let us know what you think. One of my goals for this version of Stepping Stone is to make it more interactive. Let's see how it works.
All the best,
Chris Cavert, Ed.D.
Let us know what you think. One of my goals for this version of Stepping Stone is to make it more interactive. Let's see how it works.
All the best,
Chris Cavert, Ed.D.

 RSS Feed