FUNdoing - Activities for Team Builders
  • FUNdoing
  • About
  • Blog
  • Resources
  • Books
  • Trainings
  • Ricochet
  • Contact
  • Store

On Board (Created by Neil Mercer)

3/26/2017

2 Comments

 
Picture

Neil Mercer (Tuval Organizational Effectiveness) is a long-time virtual friend of mine from Israel (and a FUN Follower). Years ago he shared an activity with me called, Pressure Cooker - one of the activities that lasted all the cuts over the years to make it into my latest book, Portable Teambuilding Activities. Neil and I have kept in touch ever since. Recently he shared this activity with me (he named Low-Cost Flight) that came to him early one morning - he told me he had to get out of bed to write it down before he could get back to sleep. 
After a couple of emails back-and-forth, and receiving his permission to share, what you find below is how I'm presenting, what I will be calling, On Board - mostly Neil's words with some tweaks from me. I like the potential metaphorical opportunities with the name. Neil tells me he likes the name but, "It doesn't work so well in Hebrew." So he'll be staying with Lo-Cost Flight. 
Neil and I can now use your help. Give this one a try and leave us some feedback in the Comments section below. I like the potential - tell us what you think!
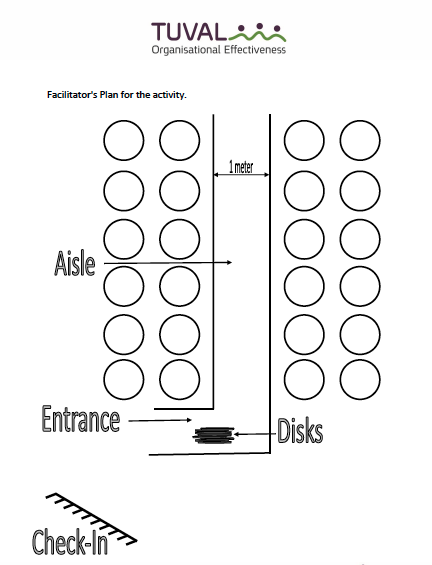
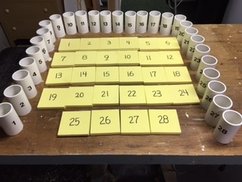
Preparations: I will be using a 50 foot activity rope to outline the plane and the boarding door - maybe even some foam noodles to outline the wings and cockpit. I will also use two sets of numbered spots/discs - one set for the seats on the plane and one set for the passenger's seat assignments - I plan on handing out the seat assignments as the passengers (participants board the plane). With this gear I'll create the scene as shown in the diagram Neil created (see below). 
Presentation: In these days of cheap air travel, airline companies are cutting back on overheads in all sorts of ways. Seat-allocation has become self-service. Take-off windows for low-cost flights have also become very tight. As such, once the plane door opens, the passengers must board and get to their seats as quickly, and safely, as possible for the on-time  departure. 
​You are about to embark on a flight to Madagascar. Your seats are allocated according to the numbered disks that will be handed out to you at the entrance of the plane. The number on the disk is your seat number. You may only obtain a seat assignment disks once the plane door opens. The seats are numbered (with similar numbered discs) in ascending order from the front of the plane to the back and across the rows from left to right. So, seat number 1 is the furthest seat on the left hand side in the first row. 
​The Objective: Your traveling team is challenged to find the quickest way for all of you to board the plane and take your allocated seats (stand on matching numbered disks).
 
Process: You have 15 minutes to plan before you make your first official timed attempt. During your planning time, you may try as many boarding attempts as you would like. Between each attempt the seat number discs will be randomly re-set.
​
After your first official timed attempt you will then declare your challenging, competitive and yet doable best target time. You then have up to two more official attempts to meet or beat this target time. You will be given up to five minutes to plan before each of your next attempts, but during that time you will not be able to board the plane. 
Boarding Rules:
  • You must wait at the check-in desk until, “The doors are open!" call, at which point the timer will begin. The timer will stop when the last passenger is seated in their place (standing on his/her matching numbered disc).
  • After picking up a numbered disc you must board the plane. Once on board you may not deplane or swap seat assignments (numbered discs) with anyone.
  • You may only board the plane through the entrance and once aboard you may only move the length of the plane along the aisle or over into a row of seats.
·      Once on the plane you may not pass anyone standing in the aisle.
  • In the seat rows, you may walk past an empty seat (numbered disc) but you may not pass in front of an occupied one. Anyone in a seat (on a numbered disc) between you and your seat must step into the aisle so you can move to your seat.
  • When everyone is seated and time has stopped, the seating order will be checked. Five seconds will be added to your overall time for each person who is out of place. 
Here's a PDF of the Boarding Rules you can print out and give to the group if needed:
onboard_boardingrules.pdf
File Size: 41 kb
File Type: pdf
Download File

Here's a suggested set-up diagram provided by Neil: 
Picture

Neil, thanks so much for sharing with us! I'm excited to try it out. 

Have FUN out there my friends. 

Chris Cavert, Ed.D. 

2 Comments

Michelle Cummings' Top 10 Activities

3/21/2017

0 Comments

 
Picture

Michelle Cummings is the "Big Wheel" behind Training Wheels - the best and most comprehensive (in my opinion) team building equipment resource site on the planet! Michelle is a well-know author (see Playing With a Full Deck - one of my favorites on how to use a standard deck of playing cards for team building activities), trainer, and adventure education entrepreneur.
I met up with Michelle at the last AEE Conference where she shared with me (over a cup of coffee) her Top 10 Activities (at that time). THANKS MICHELLE!! Here we go....
Simon Says - Michelle (and Scott Gurst) take this age old favorite elimination game and turn it into a "teaching tool". Check a video of the process HERE.
Handshakes with Questions - When introducing the different "action" handshakes, add some questions with each one in order to connect the players in a more meaningful way. For example (if you know these handshakes) when do the "Lumberjack" handshake partners share things they look forward to (in the program of in the future) as they saw the log. When doing the "Salmon" handshake partners share at least one thing that challenges them (like the challenging swim up stream the Salmon make every year). When doing the "Cow" handshake, partners share something that would be out of their comfort zone. (Here's a VIDEO of Nate Folan doing "Five Handshakes in Five Minutes" as an example of some action handshakes.) Any handshakes can be incorporated with questions.  
Switch, Change & Rotate - I fun interactive challenge for small teams of three or four (any large group can be divided into small teams. (I learned this one from Mike Spiller years ago. I use it all the time. Here's a write-up I found in my files:
Needs & Numbers: No props are needed of the basic variation. Any number can play (maybe no more than 100 people)
 
Set Up: Divide your large group into smaller groups of 3 or 4 people.

 
Directions: Here’s the summary – have each of the small groups form a single file line in front of you with enough space between each other to move around. You will be teaching everyone to do a certain action based on a word that you give them. When you say "Switch" the player in the front of the line (in each small group), moves to the back of the line – have the group practice this a couple times - after saying "Switch" a couple times. When you say "Change" each line turns 180 degrees to face the opposite direction. In turn the person who started in the back of the line is now the new head of the line – have the groups practice this a few times until they are facing you again - say 'Switch" a few times. When you say "Rotate" the person in the front of the line goes to the back and the person in the back moves up to the front. Practice this a few times along with the other two words they know. All of this practice is done with all the lines staying in the same place.

To up the challenge add the word "Go" - This means each line is tasked to move forward together around the area. Then, be sure to teach them that when you say "Stop" all lines stop moving.  
 
After some stationary practice, start the small groups moving forward on 'Go" – meaning, the person in the front of the line is leader who walks around the playing area while the rest of the group follows him or her. Now, use your signal words get the group to change people around – keep reminding them to keep moving if you haven’t said "Stop".
 
About 5 or 6 minutes of play works well. If the group is willing, have all the players put their bumpers up while in their line and then have everyone close their eyes for some moving and changing around. Be mindful to call "Stop" if you anticipate any danger. 

Picture

​Ubuntu Cards
- HERE's a link to information and activities for the cards. One of Michelle's favorites with the cards is having the pairs of players find something they have in common with each other after they discover the common image on their two cards. 

Body Parts Debrief - HERE's a link to this popular prop-based debriefing tool. A really fun and engaging way to lead a learning discussion. 
Shuffle Left, Shuffle Right - This is an interactive group processing activity found in the book, A Teachable Moment  by Cain, Cummings (Michelle) and Stanchfield. 

The 'process' involves the group circling up and connecting together (or not if it's not a good idea) - like arms over shoulders or linking elbows. Everyone begins to, slowly, shuffle to the right (the circle turns) until someone says "STOP". This person then shares something they learned (or whatever you set up) during the day. When this person is done they call out the direct the circle will move next - "Shuffle left!" This process continues with "Stop" and "Shuffle" until it appears everyone is done sharing. You can then call "Stop" to share a final closing thought and thank you. (Of course, more detail are provided in the book.) 

Seven Up - This is an activity Michelle and I both learned from Karl Rohnke (now, I think it can be found in his book, FUN 'N' GAMES - I can't put my hands on the book right now. I'll update this post when I can). Here's my version called:

Falling Star

Needs: A number of tossable objects and one “final” tossable – a Star, a Roll of Tape, a Rubber Chicken. Numbers: Works well with 8 to 14 players. Process: Circle up your group with players starting out about one arms length (both arms stretched out) from each other. To begin with, using a star (or Roll of Tape or….) as the final object, say something like:
 
This activity will be played in a number of steps – this number will be determined by you. The objective of the activity is to ultimately catch this star [I hold up the star for them to see]. Now, the entire group, by consensus, must agree to when the star will be tossed and ultimately caught. Before each step I will ask you, ‘Do you want to go for the star or another object?’ [At this point I hold up one of the other objects in my other hand.] The challenge level of this activity increases as more of these objects are added to the process.
 
Once you’ve introduced the activity (with still a bit of mystery to it) you can deliver the remaining stipulations as needed. I often just get started and add the rules to the process when the group needs to know them.
 
After asking which object the group would like you to use, you will always toss the object chosen with a nice high arch on it and an aim of landing in the center of the circle. Before you toss the first object, tell the group what it will look like (i.e., a high toss into the center of the circle) and let them know that someone from the group must catch it if you want to move ahead. Ask them, “Are you ready for the toss?” If the group tells you they are not ready, give them some time before asking again. If the group does not stop you, say, “1, 2, 3, toss” – then send the object out into the circle. If the object is not caught, have someone pick it up and toss it back to you and start the process again. Ask which object they want you to use, then ask if they are ready, and then toss.
 
If someone catches the first object you can now add more rules. The group must always start each step of the process (before a toss) in the large circle formation. Every object held by a player in the circle must be tossed at the same time when you call “1, 2, 3, toss” (all objects tossed on the word “toss”). Each object, including the one tossed by the facilitator, must be arched up at least three feet above the tallest player in the group and must be caught by someone in the group other than the person who tossed it. (Will you, the facilitator, be allowed to catch an object? This would be something interesting to consider.) If, at any time, any object touches the ground after the toss, all the objects are given back to the facilitator and the game starts over with one object. Also, if there are any unsafe situations (close calls) that occur during the activity (deemed by the facilitator) all the objects are returned to the facilitator and the game starts over. You might have to explain what a close call is if you think your group needs this information.
 
So, now that there are two objects out there, “Which object would you like me to toss? Okay. Are you ready? [if you don’t hear anything to the contrary…] 1, 2, 3, toss!” 
Poker Face - This one is found in the book Playing with a Full Deck - noted above. If you SIGN UP for Michelle's weekly (Wednesday) newsletter you will receive an ebook with some of the activities from the Full Deck book - one of them is Poker Face.
"As If..." Greeting - This is an energizing ice breaker that Michelle uses to role play some of the group outcomes that are possible during a program. The activity can be found in Michelle's book, Setting the Conflict Compass. The book includes "hands-on activities that held address the issues of conflict resolution, prevention and diversity." 
Key Pad 2 - One of my Top 10 favorites as well - I call it Corner-to-Corner (named by Frank Fry and his students). You can find the full description of this one in my newest activity book, Portable Teambuilding Activities. It's a great one for learning about sharing resources and considering the needs of others beyond yourself. The Key Pad 2 is written up in one of Sam Sikes' books (I'll come back here and put the reference in when I can get my hands on my books.) 

Thanks for sharing with us Michelle!!

Have FUN out there my friends! Keep me posted. 

Chris Cavert, Ed.D. 

0 Comments

Tube Switch 2.0 (Double Play)

3/15/2017

0 Comments

 
Picture

Tube Switch (1.0) made it's debut back in November of 2014. (HERE is the original post.) The equipment was easy to make using toilet paper rolls and index cards. It's been so fun for me to see this activity grow into the new 2.0 version. 
Picture
Tom Gardner was the first to show off his new kit. He used 2 inch diameter PVC tubing, cutting the tubes about 4 inches high then adding numbered stickers - 1 to 28. For his number spots he picked up some yellow floor matting and cut out 4 x 4 inch squares before adding the numbers using a marker. (Construction Note: Each number should be small enough so it can be completely covered by a tube when placed over it.)   

Picture
Recently I found out there were a couple sets made near me in Texas. My good friend and colleague Jennifer used (what I'm calling) the Double Play (Texas) Kit - shown in the video below. One Tube Switch set was made with numbers and the other set with letters. The number/letter spots were made with index cards which were laminated after the numbers/letters were added. 

The tubes for this Texas (Double) set are made from 1.5 inch PVC tubing, cut 4 inches long. The numbers and letters were printed on copy paper, cut out and then taped on the tubes with packaging tape - they look nice and clean. There are 26 letters (of course) and 26 numbers.  
Tube Switch: Double Play
Set up two separate Tube Switch areas. Use a 50 foot (or longer) activity rope to make a nice big circle for each area - have the rope circle areas about 20 feet apart. In this (Texas) version, one circle has the letter set and one circle has the number set.

Place down a set of number/letter spots in each area (see video). For a more challenging version of the activity, don't place any of the number/letter spots too close to the edge - far enough away so a player cannot lean over, while standing outside the rope circle, and  look down through a tube to see the number. 

After all the number/letter spots are placed set down the tubes over the numbers/letters - the tube numbers/letters SHOULD NOT match the numbers/letters on the cards. Be sure the tubes are completely hiding the numbers/letters. 
Gameplay:
After running this activity a number of times, I've found a good range of participants per Tube Switch area to be 8 to 12. With Double Play you get more action and there is now the potential to collaborate if you set it up that way. When you have enough people for Double Play, divide them into two groups. Assign one group to each area.

Here's the collaborative idea:  
Objective:
Move all the tubes to their matching numbers/letters.
 
Rules:
  • Only two players can be inside the Tube Switch area at a time. 
  • Each person in the area can pick up and set down one tube - a tube can go back down on the same spot it came from if necessary.
  • When a tube is set back down* on a spot the number/letter must be completely covered - tubes are always placed down in the vertical position. 
  • A player, after exiting the Tube Switch area, may not go back into the area until someone else has entered and exited. 
  • Time will start, for both groups, when the first person steps into one of the Tube Switch areas. Time stops when all the tubes, in both areas are matched up with their number/letter spots. 
  • ​Players around the outside of the Tube Switch areas can help in any way they can without going "into" the area. [You will need to define what "into" means for them.]
*One interesting consideration in this activity - it is not a requirement to set a tube back down on a number/letter spot with the number/letter upright. If someone thinks of this, flipping over a tube that is going down on it's matching number/letter will help the group(s) know which pairs are matched up - thus saving time to validate matches at the end. 
Let the groups try at least twice (even three times) to see if they can improve their overall time. Better yet, after each attempt, have groups "switch" (get it?) Tube Switch areas. 

​Be sure to check out the video to get a glimpse of the action. 
Have FUN out their my friends! Let me know (pictures!!) if you build a set of your own and how it works out for you. Leave a comment below. 

All the best, 

Chris Cavert, Ed.D


0 Comments

Table Top Key Punch (via Rubber Chicken)

3/10/2017

0 Comments

 
Picture

There are lots of Key Punch variations out there - let's add another - why not. We already have the numbers! (If you haven't done so yet, check out Key Punch: The Overlap recently posted at the FDblog.) A colleague of mine (Thanks Kevin!) recently presented this version of the activity to a group during a "Points Challenge" program. This was one of the stations. Any number of different teams could play. A team needed to have 6 to 8 players to make an attempt - multiple attempts could be made by any one team and that team would then record there best score (see Scoring below.) . 
Set Up: Numbered spots from 1 to 30 are scattered out on top of one or two table(s) (easier access to the spots). One Rubber Chicken and one stop watch is provided - left out on top of the table(s). (See photo above.) 
Directions: 
  • When the team of 6 to 8 players is ready (any amount of planning and practice can be taken), someone on the team says "GO" and starts the stopwatch. 
  • One player picks up the rubber chicken and touches it to spot Number 1 - any part of the chicken can touch the spot. 
  • This first person "hands off" (not throws) the chicken to another player in the group. This player must then touch the Number 2 spot with the chicken and then hand off the chicken to someone else in the group. This process continues until all 30 spots are touched by the chicken. (Whack-A-Mole-esk) 
  • No player, using the chicken, is allowed to touch two or more numbered spots in a row.
  • When the number 30 spot is touched, the time stops - someone needs to stop the stopwatch.  
Scoring: 
  • Under 60 Seconds: 200 Points
  • 61 to 90 Seconds: 100 Points
  • 91 to 120 Seconds: 50 Points
  • ​Over 120 Seconds: You might want to try again!
Upon observation of a number of teams, the activity was energizing and exciting for them. And yes, under 60 seconds is possible! Of course, with good "teamwork!" 
Have FUN out there!

Chris Cavert, Ed.D. 
0 Comments

Story Line Processing with Chiji Cards

3/2/2017

1 Comment

 
Picture

As many of you know I'm a fan of Chiji Cards. I love their versatility. They started out as a "picture processing" tool. Now, they can be used in a variety of activities. (See The Chiji Guidebook HERE.)
One of my favorite activities is using the cards to prompt "Personal Stories" that participants share with each other at different times throughout a program. I will use "happy moment" stories at the beginning of a program. I will use "challenging moment" stories after the group has some time to get to know each other. And, I will use "learning stories" at the end of a program to discuss important moments. In each case, participants pick a Chiji image card that prompts a story for them related to the theme. 
In an earlier FUNdoing Blogpost, I shared about how I've been using Dixit cards to tell stories and create story lines (find it HERE). You can also create story lines using Chiji Cards (or your favorite image cards). Recently I found that the Dixit cards are a bit too complex for some of my younger groups (decoding the Dixit images takes more cognitive time), so I've gone back to using the simpler image Chiji Cards with them. 
Story Line Processing with Chiji Cards

​At the end of a program scatter all the Chiji Cards, image side up, on the floor/ground/table. Then ask your group to choose images that highlight different moment in times from their program. The timeline story can begin from before they even arrived at the program site to the point they are now, or even beyond - what will it be like once they leave the program site?

​As the facilitator, use probing questions related to their overall program objectives to remind them of certain experiences within the sequence of the day. For example: 
  • Before you arrived today, what were some of the feelings you were having? Find an image or images that represent those feelings.
  • Once you arrived and we started the program, what images represent how your group was interacting with each other?
  • During the Whale Watch (for example) what image best represents the way you were communicating with each other? Come to a consensus on just one image. 
  • After the Team Wall, what image(s) best represent how you were doing as a "team"?
  • Looking back on the day, what image(s) best represent how you are feeling right now as a group? 
  • Looking ahead, after you leave here today, what image(s) will best represent the things you want to remember to do when you go through the challenges ahead?  
As the group chooses specific images, place them down in sequence to represent their timeline of work together. As they move down the timeline there will be fewer images to choose from. I like this consequence because it forces a little more creative thinking and image interpretation. After the timeline has been created, provide a brief summary of events for the group so they can hear "their program story" one more time before they go. 
Be sure to get a picture of the timeline you can send them (e.g., multiple shots that can be cobbled together or a panorama) so they can print and post it as a reminder of their experience and learning. 
Do you have a fun way to use Chiji Cards (or other image cards)? Leave us a comment below. 
All the best, 

Chris Cavert, Ed.D. 
1 Comment
    JOIN
    FUNdoing
    Fridays
    Team Building Activities sent to your email every two weeks! 
    Picture
    FREE Processing Activity just for signing up! 

    Picture
    Processing for Beginners
    FREE Mini-Course

    Click for Information

    Some Team Building Tools at the STORE! 
    Picture


    Details & Purchase
    Picture
    Details & Purchase
    Picture
    Details & Purchase

    Blog Author

    Dr. Chris Cavert is an internationally known author, speaker, and trainer in the area of adventure-based activity programming and its relation to community and pro-social behavior development.

    Blog Purpose

    This blog is a space for hands-on programable fun - energetic activities and ideas that can be used as a means to bring people together; activities and ideas we as educators can add to our social development curriculums. 

    Categories

    All
    Activities
    A Files
    A-Files
    Challenge Course
    Chiji Cards
    CUP Activities
    Ed Tech 4 Adv Ed
    Facilitation
    Fun Props
    Lessons
    Let's Talk About
    List Play
    Noodles
    On Pedagogy
    Print N Play
    Processing
    Programming
    Puzzles
    Read This
    Repurposed
    Resources
    Small Group Activities
    Tools For Team Builders
    Top 10 Activities
    Variations
    Videos
    Virtual
    What? & Why?

    Archives

    March 2023
    February 2023
    January 2023
    May 2022
    April 2022
    March 2022
    February 2022
    January 2022
    December 2021
    November 2021
    October 2021
    September 2021
    August 2021
    July 2021
    June 2021
    May 2021
    April 2021
    March 2021
    February 2021
    January 2021
    December 2020
    November 2020
    October 2020
    September 2020
    August 2020
    July 2020
    June 2020
    May 2020
    April 2020
    March 2020
    February 2020
    January 2020
    November 2019
    October 2019
    September 2019
    August 2019
    July 2019
    June 2019
    May 2019
    April 2019
    March 2019
    February 2019
    January 2019
    December 2018
    November 2018
    October 2018
    September 2018
    August 2018
    July 2018
    June 2018
    May 2018
    April 2018
    March 2018
    February 2018
    January 2018
    December 2017
    November 2017
    September 2017
    August 2017
    July 2017
    June 2017
    May 2017
    April 2017
    March 2017
    February 2017
    January 2017
    December 2016
    November 2016
    October 2016
    September 2016
    August 2016
    July 2016
    June 2016
    May 2016
    April 2016
    March 2016
    February 2016
    December 2015
    November 2015
    October 2015
    September 2015
    August 2015
    July 2015
    May 2015
    April 2015
    March 2015
    February 2015
    January 2015
    December 2014
    November 2014
    October 2014
    September 2014
    August 2014
    July 2014
    June 2014
    May 2014
    April 2014
    March 2014
    February 2014
    January 2014
    December 2013
    November 2013
    October 2013
    September 2013
    August 2013
    July 2013
    June 2013
    May 2013
    April 2013
    March 2013
    February 2013
    January 2013
    December 2012
    November 2012
    October 2012
    September 2012
    August 2012
    July 2012
    June 2012

    RSS Feed

Proudly powered by Weebly