FUNdoing - Activities for Team Builders
  • FUNdoing
  • About
  • Blog
  • Resources
  • Books
  • Trainings
  • Ricochet
  • Contact
  • Store

Solve For (with Cups)

11/11/2023

0 Comments

 
Picture

I was planning for a teacher training program recently where I was tasked to include some community-building activities that could tie in with academic subjects. On my list were a few Cup activities – one being Line Um Up (from Cup It Up). It was an easy step to adapt this one into a mathematical challenge. After trying it out for the first time with this group of teachers, here’s what we have so far:

Solve For

Needs & Numbers:
  • 26 numbered cups (see above) – numbered 1 to 26, for every group of three to five participants.
  • One game spot (or something similar).
  • One ‘Cup Station’ for each group: a taped rectangle on the floor, a hula-hoop, a small rope circle, or a table.
  • One large sheet of paper (e.g., flip chart paper) and a marker.
  • One or two index cards and a pen for each Cup Station.  
  • One timing device. 

Note: I’m suggesting Cups because I already have multiple sets of numbered cups ready for other Cup It Up activities. If you’re not a cupper yet with the resources ready, you can make number sets with index cards or small paper plates. I use the numbers 1 to 26 because Cup activities also use lettered sets, A to Z (26 cups here). So it's a good correlation. 

​On another note, the 'other colored' Solo Cups are usually around the stores during the Fall and Winter Holidays. (I'm also guessing you can get the colors online all-year-round?)


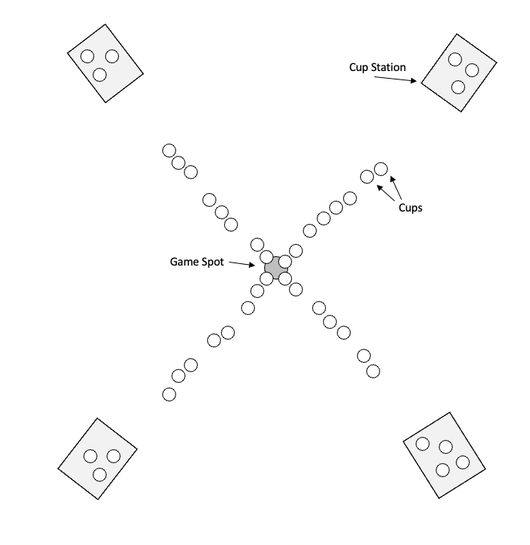
Set-Up: Check out the diagram below (the diagram below shows cups in play - before play, all cups will be at the Cup Stations). Prior to the activity, you’ll want to set up the Cup Stations you’ll need (one for every three to five players) – arrange the stations like the numbers on a traditional clock face. Then put your game spot (or something similar) in the center of the ‘clock.’ I like the spacing to be about 15 feet – from the game spot to the Cup Stations. Then, set one stack of 26 cups at each Cup Station. If the Cup Station surface is flat enough, stand up the cup stack open end up. If the stack won’t stand, simply lay it on its side in the cup station.

Picture

Process: 
  • Create groups of three to five participants. Have each group pick and stand by one of the Cup Stations. Tell them not to touch the cups until instructed to do so. 
  • Let everyone know they will be doing some math during the activity. (You might decide to discuss the physiological and psychological reactions to math at this time if it's noticeable.)
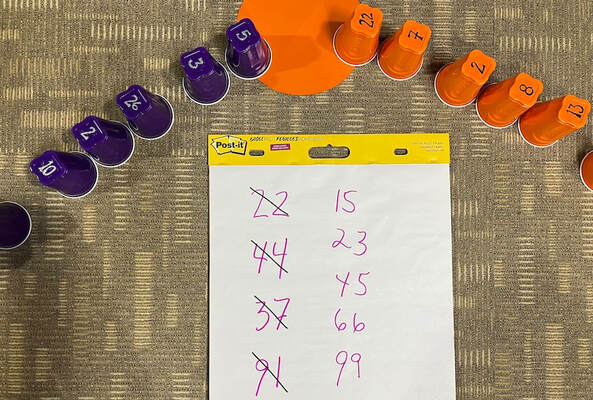
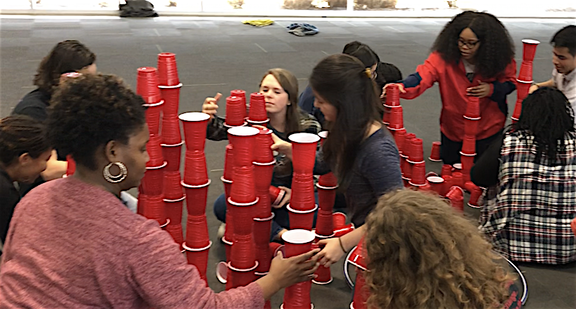
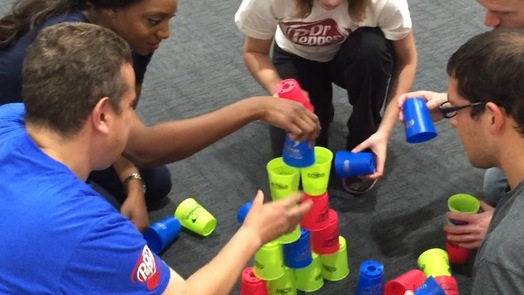
  • Show all the groups the first set of four numbers listed on the large piece of paper (see header picture for an example). 
  • The objective, for each Cup Station team, is to solve for each number on the list using the numbered cups at their station. A formula – using more than one cup – must be created to solve for each number. 
  • Any mathematical symbols can be used along with the numbers to reach the sum needed – the numbers on the list. (The symbols are invisible, or assumed.)
  • Formulas must be made in the order of the numbers on the list. So, (using the second list of numbers in the header picture, for example), solve for 15 first. The first cup of the formula for 15 must be placed on the game spot, and then the next cup or cups follow in line from the game spot towards the team's Cup Station (see the diagram above). 
  • Write down your formula for each number on an index card so the formulas can be verified at the end of each round.   
  • After the first formula of cups is placed down, the group can work on solving for the next number. When this next formula is ready it can be placed down in the line – leaving a noticeable space between formulas. 
  • When all teams are ready – after answering questions – you can call "GO!" and start the timer. Team members can then touch their cups. 
  • Only the cups of a formula can be out in the playing area (in line). All other cups must stay on/in the Cup Station during the solving phase of the formulas. 
  • Once all teams have placed down a formula for each number on the list, the time stops. This is an important distinction – the time does not stop until all teams have 'Solved For' all numbers in the Round.
  • Someone (or more than one) from each team will then verbally share the formulas for each number on the list – use the index card if needed. If a formula is incorrect ask the group what they will need to do to fix it – then have them fix it. (There is no penalty/consequence.)
  • Once all the formulas have been verified (and fixed if needed), share the overall time with the group. (The first time recorded with three teams in play was 2 min., 37 seconds, using the first list of numbers in the header picture above.)
  • ​This 'overall time' (as I'm suggesting for now), is the baseline for the remaining Rounds. (Same expectation for more work. Fair?)
  • Round one is four numbers. Round two is five numbers. Round three is six numbers, and round four is seven numbers. Each Round starts the same way as Round one. NOTE: So far there is not an 'ideal' set of four lists of numbers – will a particular list of seven numbers be impossible to solve for? (See the Variation below to provide more resources to work with.)   

Why I Like This Activity?
  • When we use an 'all group' time, there is a better chance for collaboration to take place in order to meet the time expectation. 
  • Using math 'problems' to solve can bring up some good discussions about skills, abilities, and mindsets, as well as roles and responsibilities. If someone is 'not good' at math, what role do they play during each Round? 
  • Using the overall baseline time as the benchmark for each Round will, most likely, force collaboration in order to meet the expectation. And what compromises will be made (e.g., skill acquisitions) for the sake of the expectation? I'm thinking, because we have to meet a 'standard' the participants who excel at math will do the work – others will not get the practice or the encouragement to practice.
  • I'm curious to find out if some groups will not care about the expectations and focus on the 'process' of including everyone along the way – everyone feels they contributed to the results.  

Variations: 
  • Use index cards for the number list they will solve for during each Round (instead of writing the numbers on one sheet of paper). Give each group the same list of numbers, but don't inform them they are the same – if the groups share this information, it's okay. And maybe will lead to some collaboration? 
  • What if you put all the 'math-smart' participants in one (or two) teams? How long will it take, without collaborating, to solve for all the numbers? (Q: What are some of the advantages of diversity?)  
  • Allow teams to use the last number in one formula to be the first number in the next formula. This 'resource' is useful for longer lists of numbers (e.g., 6 to 8 numbers). 
If you give this one a try. Let us know what else can be done. Leave a Comment. 

All the best, 

Chris Cavert, Ed.D. 
0 Comments

Team Tower Turning (with Videos)

3/26/2023

2 Comments


(About a 10 minute read.)
A friend and fellow team builder, Linda Williams, recently showed me her version of Team Waterwheel (from the book, Cup It Up: Team Building with Cups which Linda edited). She adapted Waterwheel for a training with over 300 people. Her design purpose was to work on the concepts of 'planning' and 'task implementation' with participants from a world-wide organization. I've used it now over a dozen times and I really like the versatility and outcomes. 

Linda provides a set of directions (PDF download below) for each Tower Turning team that includes general info and some goal setting (Tower Height Goal and a Building Quality goal - which is the number of 'collapses' the team will allow themselves along the way), and Team Tower Build Operational Procedures. There is also a Team Tower Turning Reflection Questions handout for you - a variety of questions to choose from to bring out the learnings from the experience (these Reflection Questions could also be given to each group to work through on their own during the designated reflection time). 
Team Tower Turning Participant-Directed Handout
teamtowerturning_2023.pdf
File Size: 81 kb
File Type: pdf
Download File

Large Group Facilitation: When Linda worked with the group of 300, the participants were seating at round tables. All the building supplies and instructional handouts were preset at each table. During her introduction to the activity she used slides to emphasize the main points (some of her slides at the right) - one of the slides had an embedded video of the 'turning' process. My largest 'turning' group so far has been 72. I didn't use technology, just verbalized the instructions and showed them an example of how to start and how the turn is done. 
Picture
Here are the basics of the activity to supplement the handout: 
​
Needs & Numbers:
You'll need 12 plastic cups and 15 - 4 by 6 inch index cards for each group of four to six participants. 

Time: This one can take up to 40 minutes depending on the amount of time available for the reflection phase. Breakdown: 5 min. to introduce, 10 min. of 'required' planning time to read through the 'Operational Procedures' and set Goals, 12 min. of building time, and at least 10 (to 20) min. of reflection time. 


Note to Facilitator: It is important to include enough time to debrief the activity with your participants. See the sample Reflection Questions in the handout to consider including in your after-activity discussion. Feel free to modify or add questions that will best suit your participants and the desired outcomes of your session.

Group Reflection: Read through the Reflection Questions in the handout to see the learning possibilities in the activity. 

Why I Like Tower Turning: 
  • ​Easy to find and use props (and there is so much more you can do with CUPS!)
  • Self-Directed instructions provide more decision-making and problem-solving for a group.
  • There is a clear picture of success and failure - when the tower falls, the group has the opportunity to identify and then solve the falling problems. 
  • It can be scaled to almost any size group (if you have the cups and a way to project your voice).
  • When I want to go deeper, I have groups take about 5 to 10 minutes to identify the attributes of a good working team and write these findings on the index cards (you'll need some markers). And then we can use this attribute 'data' to consolidate a take-away list of behaviors the whole group wants to focus on after their team building program. 

​Let us know how this one goes for you! Leave a Comment below. 

All the best, 

Chris Cavert, Ed.D. 
P.S. Tools for Team Builders Bonus Video: Tube Turning
2 Comments

Micro Cup It Up Activities: Flip Flop Tower & Reverse Pyramid Build (with video)

8/13/2021

0 Comments


If you've been following the fun for a while, you know I love team building with cups (in non-alcoholic ways). And, you might also know I'm the co-author of the book, Cup It Up: Team Building with Cups (with Barry Thompson). The book is available for immediate download or paperback version.

Recently I was organizing some pictures and video files and found some cup action using the smaller one-ounce cups (initially presented at NCCPS: The National Challenge Course Practitioners Symposium - a.k.a., the Un-Conference near Boulder Colorado). 
Picture
Those of you who have been team building with cups for a while should be able to pick up the steps from the video. (As always, if you have any questions be sure to email me: [email protected]) Here are some finer details for each activity: 
Flip-Flop Tower
All the details are HERE for the Macro Cup version - plays the same with the smaller cups! 

Reverse Pyramid Build
You will find complete details for this one in the Cup It Up book (along with lots more cup activities). Here are the basics: 
  • Pyramid Rule: Each horizontal level/row of cups has only one more cup than the level above it. 
  • Start with one cup on the table (i.e., flat surface). 
  • Only the cup(s) touching the table can be lifted.
  • Cups may only be added underneath the pyramid structure. 
  • If a cup falls from the pyramid in any way, start over with one cup. 
  • If you are not lifting the pyramid, only by the bottom row, you can use your index fingers (only) to touch the pyramid structure. 
The Reverse Pyramid Build is one of my favorite cup activities. It has the tactile, visual and auditory connections that engage participants. It brings up great conversations about success and failure (when you fail you see it and you hear it) and small groups are active in planning and carrying out particular roles and responsibilities - some are more demanding than others. All good stuff to talk about. 

Do let me know if you have questions! Email: [email protected]

Have FUN out there. 

Chris Cavert, Ed.D. 
0 Comments

CUPple-a-Points (with Video)

1/3/2019

0 Comments

 
Picture

First and foremost, I want to thank the wonderful team building facilitators at BRIDGES for trying this activity with me (for the first time ever). And, a BIG shout out to the creative mind that gave us the name for this one. (It was fun watching you all work!) 

Context Note: The footage was taken at a day-long team building facilitator training. I kept in the "learning" conversations. I thought some of you out there might benefit from the thinking that went on during this discovery process. (Alfie Kohn might call this, taking the facilitators, and you, "backstage" for some Deep Modeling as a way of learning.)

More Team Building Activities with CUPS! Check out CUP IT UP 
CUPple-A-Points (here's what we have so far): 

​Set Up: Place 10 nested stacks of 30 cups each (300 Cups), inside a hula-hoop (or maybe even make a small box shape on the floor with tape).

Objective: Gain as many points as possible in two minutes. Every cup that is not touching the floor after two minutes earns you a point. 

Directions: If you have time, and the planning dynamic is part of the group's program objective (e.g., practicing planning behaviors), allow for unlimited time to plan and practice before the first official two-minute build. If you don't have unlimited time, give them, say, three minutes to plan and practice before the first build, then maybe, two minutes before the second build and one minute before the final third build.  

Note:
  • Round 1 Footage: Participants can be used as resources/props.
  • Round 2 Footage: Participants CANNOT be used as props. 

Rules: (Applied to either Round 1 or 2 set up. Each round, or variation, includes three building attempts.)
  • After two minutes, only cups outside of the hula-hoop will count for points. 
  • Any nested cups, one or more cups inside of each other, will not count for points. 
  • After two minutes, all "hand" must be off the cups. Then, after three seconds, "1, 2, 3," the cups that remain off the ground can be counted for points. (It might be faster to count the cups NOT off the floor, then minus this number from 300 for the score.) 
  • When you (the group) are ready to start an official two-minute building, let your facilitator know. The facilitator will keep time and inform you about time remaining. 
To reiterate, there are two different presentation variations so far (shown in the video - they are noted as "Rounds") - one where participants CAN BE use as resources/props, and one variation where participants CANNOT be use. We tried both to get some film of each. 

Also, at this time, I would choose one of the variations and take time for three two-minute building sessions in order to see how the evolution of the builds turn out. What will be "success" for the/your group? 

Let us know how it goes. Leave a Comment below. 

All the best, 

Chris Cavert, Ed.D. 
0 Comments

Immobile Chopsticks (with Video)

11/1/2018

0 Comments

 
Picture

If you know me, you know I love team building with noodles!! Noodles are one of the most versatile activity props on the planet! My good friend and team builder Sam Sikes and I wrote a couple of books on the subject - you can find 50 Ways to Use Your Noodle and 50 More Ways... HERE. 
Immobile Chopsticks is from our book, 50 Ways... It's a variation of the classic Pipeline activity. (I've written about Pipeline Variations in the past. And, another related, called Bridges & Traits.) 

In this noodle version here, it takes two players to make the channel needed to allow the tennis ball to travel from one point to another. And, multiple pairs of noodled players to get somewhere. Here are the basic rules in this version (video below) of Immobile Chopsticks.

Rules: 
  • Each player is allowed to touch/use one, and only one, noodle prop.
  • Tennis balls (six of them), start 60 feet from a set of six cups (Volcano Tops) circled together - cups are open-side down. (You'll see the configuration in the video.) 
  • If a tennis ball is touching a players noodle, that play may not move his/her feet in the direction of the cups. So, no tennis ball touching your noodle, you can move in any direction.  
  • Only one tennis ball is allowed to touch a pair of noodles at any time.
  • If a tennis ball drops to the ground/floor, this tennis ball is returned to the start (a player is allowed to pick up the ball and return it to the start). 
  • When all the Volcanos (cups) have been capped, you have successfully completed the task. 

Adjustments:
  • The closer the cups are together in a circle, the more challenge.
  • Players can move their feet if they have their eyes closed. 
  • Turn the cups over and drop the tennis balls inside (a bit easier) - if they don't let the cups tip over.   
Why I Like This Team Building Activity: 
  • You can run this one with any size group - if you have enough equipment. 
  • I can break the group up into smaller groups, from four to twelve in a group. 
  • I can use it as a competitive activity - First, Second & Third places. 
  • I can use it as a cooperative activity - "All the Volcanos in the room must be capped as soon as possible." 
  • I can vary the replacement of the cups (Volcanos) - in a small or larger circle, or randomly around the room. 
  • And, noodles make anything fun!! 
Let me know how it goes. Leave us a Comment below. 

​Chris Cavert, Ed.D. 
0 Comments

Over the Top (with Video)

2/28/2018

4 Comments

 
Picture

My friend Barry and I put out the book, Cup It Up: Teambuilding With Cups in 2017 (paperback and digital versions) - and we're not done coming up with more. My Crew friends helped me work through my thoughts and get some video (below) on this activity, so a BIG THANKS goes out to them!!

FYI: If you haven't seen it yet, there is another cup activity (not found in the Cup It Up book), Flip Flop Tower (with Video) I posted here on the FUNdoing blog back in 2016. 
Over the Top can be played indoors or out - as long as you have a stable surface to place the 9-Grid set of cups. I developed this activity with the mind-set (facilitated objective) of focusing discussions around "roles and responsibilities". Of course, there can be other objectives planned. I also wanted to see what would happen with limited directions (listed below). Also, of course, you can add more directions to make the expectations clearer. (One of my mantras: More directions, less creative freedom.) Okay, let's go!

Needs: For every small group of 5 to 7 players, you need 1 Small Bowl, 9 Ping Pong Balls, 12 Cups and a timing device.
Picture
Set Up: Divide your bigger group into smaller groups of 5 to 7 players. Give each small group the needed equipment. 
At this time, these are the only directions I provide (what I consider to be the fewest directions needed). You are (as always) free to add, subtract and change things to meet the needs of your groups.

Directions: 
  1. The Objective: Move all nine ping pong balls from the bowl into the 9-grid of cups as quickly as possible. 
  2. The bowl with 9 ping pong balls will be the starting point and a 3 by 3 grid of cups will be the finishing point of your activity. [You might want to set up a set of cups so the teams know what it looks like.]
  3. During ping pong ball movement, all players must be in-between the starting and finishing points.
  4. All players are required to take part in moving each of the nine point pong balls.
  5. The other three cups available are to be used to move the ping pong balls from player to player.
  6. The first player can pick up and move one ping pong ball at a time.
  7. The last player is responsible for getting the ping pong ball into the 9-grid of cups. 
  8. Ping pong balls are transferred from player to player overhead - the cup with the ping pong ball goes overhead and the player pours the ball into the cup of the player behind him/her. This process continues until the last player who is responsible for getting one ping pong ball into each cup. 
  9. Someone in each group will be required to time each attempt made. Time starts when your facilitator says, "GO" - the first ping-pong ball can then be picked up. Time stops when there is one ping pong ball inside each of the 9-grid cups. 
Notes: I give myself enough time on this activity for groups to make at least three attempts in order to improve their process (i.e., get a better time). I will start each attempt so each group begins at the same time - each group's timer starts their time when I say "GO". Then, they are responsible for stopping their time when there is one ping pong ball in each of the nine cups in the 3 by 3 grid. 

After each attempt, I lead a discussion about the different roles and responsibilities taking place in each group and what's important to know about each of the roles. We also talk more about the responsibilities of each person (in their role) and how they are able to manage their time - what can save time and what they focus on in order to save time. In general, we also talk about what's been working for the group and what they might want to do differently before the next attempt. 

When appropriate, I also will graph the times for each group so that we can collect data from the process. This data could lead to some collaborative sharing of ideas. 

Finally, before each attempt, I will encourage players to change roles if people want to experiment with other responsibilities. 
Things to Consider:
  • Add the Rule - If a ping pong ball touches the floor/ground, it must go back into the starting bowl. 
  • Have one cup for every participant. 
  • Establish the distance between the bowl and the 9-grid so players will need to leap frog to the back of the group to keep the ping pong balls going.
Let me know how it goes out there my friends. How do we make it better?

All the best, 

Chris Cavert, Ed.D. 
4 Comments

Flip Flop Tower (CUP IT UP Teaser with Video)

9/29/2016

2 Comments

 
Picture

(THIS POST WAS UPDATED AUGUST 2nd, 2017)
GO HERE to find a fully updated and detailed downloadable write-up for Flip Flip Tower.
As some of you might know, my friend Barry Thompson and I have just finished up a team building activity book called Cup It Up: Teambuilding with Cups! (Find the downloadable ebook at the FUNdoing Store or the paperback on Amazon).
BONUS ACTIVITY: Flip Flop Tower. We did not put this one into the book CUP IT UP, so it's a perfect bonus and teaser to demonstrate the power of team building with cups. You'll notice in the picture above the group is using Speed Stack Cups (if you have them the different colors make for a great visual). In the picture below the group is using the red Solo brand cups. They both work great. 
Needs & Numbers: For every group of 2 to 5 participants you'll need 36 cups (as noted above, Speed Stack or Solo cups work great). You will also need a solid surface, at ground level, to build from. A wind-free environment is also a good idea if you are not working on objectives like frustration or anger management! 
Procedure: I've been using this activity a lot lately - since I just developed it about a month ago - at the beginning of a program as an energizing team-builder with a little tension. It doesn't take long to present and play, the directions are simple, and it provides a nice starting point to talk about the types of activities a group will be going through during their program. 

No matter the size of your group (so far my biggest group has been 50), divide them up into small groups of 2 to 5 participants (with my group of 50 I had 10 groups of 5) - you'll need 36 cups for every small group. Ask each small group to find some space in the activity area to build their tower. After everyone is settled into their spots, provide the challenge. 
​
Picture
The Objective Using only the 36 cups you have in your possession, build the tallest free-standing tower in 60 seconds.
Rules for Building: 
  • One individual cup is added to the tower structure at a time. (Note: Each group is building only one tower structure.) 
  • Each person in the group must add one cup to the tower structure before anyone adds in a second cup to the structure. Then, everyone must add a second cup to the structure before anyone can add a third, and so on until the time is up. (Note: the order of turns can change during each round of turns.) 
  • ​When the horn blows (whistle sounds or "STOP" is called), all hands must be off of the tower structure. What remains standing will be counted for a score. 
Scoring: 
​Tower structures are scored by number of rows. Rows consist of one or more individual cups - nested cups, one, or more, inside of another, will not count as a row. (Note: The score for the red Solo cup tower is 16 (rows). 
Once the groups understand the challenge I let them know they will have three attempts to build the tallest tower possible. I then give them three minutes to plan and practice before the first attempt.  
Here's what I tell everyone before I start each attempt - "Your first row can be set up and ready to go. The rest of your cups can either be in your hands, set down on the ground, or a combination of both. Okay, is everybody ready? Set! Go!"
After 60 seconds, giving the groups continuous updates on the time remaining, call a hard STOP (e.g., horn, whistle, or yell it out). After the dust settles, have the groups count their number of rows still standing - the number of rows is their score for the first attempt. Tell the groups to remember their score. Then, give everyone two minutes to plan and practice for the second attempt. Encourage the groups to try and "better their score." 
After the second round, each group makes a note of their score. Then, give everyone one minute to plan and practice for the third and final round. Have them note their score for the third round. After all three attempts take some time to focus on one or more of the discussion points (suggestions) below based on your group's objectives for their program. 
Discussion Points: 
  • Planning - What did this look like over the three attempts? 
  • Strategies - What strategies did you plan on and did they change? Why?
  • Failure - If your structure did fall, what did you do? 
  • ​Success - How did you measure your success? Were you successful? 
  • Risk Taking - What risks did you take? What risks did you avoid? Why?
  • Collaboration - Did any collaboration take place? Was it "secret" or "open" collaboration? 
National Standard and World Record
As of the date of this post, the national average of rows in 60 seconds, for the adult (18 years old and older) bracket is 17 rows. The world record, adult bracket, is 20. 
Video Here's video of a group using Speed Stack cups. I only included two rounds to keep the video short - you'll get the idea. Note: Notice the tower in the first round is higher (for a moment) than the one the group builds in the second round - watch the behavior in the last few seconds of the second round!! Great stuff!
I've also been setting up Flip Flop with "expectations" - GO HERE for details on how expectations work - detailed write-up of Flip Flip Tower.
 
Let me know how this version goes!! Leave a comment below. 

All the best, 

Chris Cavert, Ed.D. 
2 Comments

    JOIN
    FUNdoing
    Fridays
    Team Building Activities sent to your email every two weeks! 
    Picture
    FREE Reflection Activity just for signing up! 

    Picture
    Processing for Beginners
    FREE Mini-Course

    Click for Information

    Some Team Building Tools at the STORE! 
    Picture
    Details & Purchase
    Picture


    Details & Purchase
    Picture
    Details & Purchase

    Blog Author

    Dr. Chris Cavert is an internationally known author, speaker, and trainer in the area of adventure-based activity programming and its relation to community and pro-social behavior development.

    Blog Purpose

    This blog is a space for hands-on programable fun - energetic activities and ideas that can be used as a means to bring people together; activities and ideas we as educators can add to our social development curriculums. 

    Categories

    All
    Action Songs
    Activities
    A Files
    A-Files
    Challenge Course
    Chiji Cards
    CUP Activities
    Ed Tech 4 Adv Ed
    Facilitation
    Fun Props
    Lessons
    Let's Talk About
    List Play
    Noodles
    No Props
    On Pedagogy
    Print N Play
    Processing
    Programming
    Puzzles
    Read This
    Repurposed
    Resources
    Small Group Activities
    Tools For Team Builders
    Top 10 Activities
    Variations
    Videos
    Virtual
    What? & Why?

    Archives

    April 2025
    March 2025
    February 2025
    January 2025
    December 2024
    November 2024
    October 2024
    September 2024
    August 2024
    July 2024
    June 2024
    May 2024
    April 2024
    March 2024
    February 2024
    January 2024
    December 2023
    November 2023
    October 2023
    September 2023
    August 2023
    July 2023
    June 2023
    May 2023
    April 2023
    March 2023
    February 2023
    January 2023
    May 2022
    April 2022
    March 2022
    February 2022
    January 2022
    December 2021
    November 2021
    October 2021
    September 2021
    August 2021
    July 2021
    June 2021
    May 2021
    April 2021
    March 2021
    February 2021
    January 2021
    December 2020
    November 2020
    October 2020
    September 2020
    August 2020
    July 2020
    June 2020
    May 2020
    April 2020
    March 2020
    February 2020
    January 2020
    November 2019
    October 2019
    September 2019
    August 2019
    July 2019
    June 2019
    May 2019
    April 2019
    March 2019
    February 2019
    January 2019
    December 2018
    November 2018
    October 2018
    September 2018
    August 2018
    July 2018
    June 2018
    May 2018
    April 2018
    March 2018
    February 2018
    January 2018
    December 2017
    November 2017
    September 2017
    August 2017
    July 2017
    June 2017
    May 2017
    April 2017
    March 2017
    February 2017
    January 2017
    December 2016
    November 2016
    October 2016
    September 2016
    August 2016
    July 2016
    June 2016
    May 2016
    April 2016
    March 2016
    February 2016
    December 2015
    November 2015
    October 2015
    September 2015
    August 2015
    July 2015
    May 2015
    April 2015
    March 2015
    February 2015
    January 2015
    December 2014
    November 2014
    October 2014
    September 2014
    August 2014
    July 2014
    June 2014
    May 2014
    April 2014
    March 2014
    February 2014
    January 2014
    December 2013
    November 2013
    October 2013
    September 2013
    August 2013
    July 2013
    June 2013
    May 2013
    April 2013
    March 2013
    February 2013
    January 2013
    December 2012
    November 2012
    October 2012
    September 2012
    August 2012
    July 2012
    June 2012

    RSS Feed

Proudly powered by Weebly