
Tossing stuff with tarps, sheets and towels has been a fun team building activity for a long time. (My favorite memory: Karl Rohnke getting a group to tarp toss over 100 corks in the air - check out Raining Corks.)
I finally got some video of my go-to Tarp Tossing sequence. It's part of a 2-hour curriculum I wrote focusing on cooperation. (Cooperation processing ideas below.)
Needs & Numbers: I use 6 by 8-foot medium duty plastic tarps - a good price range and they hold up well. If you can afford it, get the heavy duty plastic tarps or canvas drop cloths. (SAFETY WARNING: Be careful around the metal grommets found on most plastic tarps - don't let fingers get into the holes. I like to roll/fold up the edges a couple times [2 rolls only] to cover the grommets - this also provides for a better grip on the tarp.)
You'll also need a safe tossable object. I use a slightly deflated playground-type ball (those dollar store inflatable ones work well). I deflate them enough so if the catch is missed the ball does not go (roll or bounce) very far from the group.
Tossing works well with 4 to 8 players per tarp, middle school ages and older. (NOTE: When I worked with elementary ages the parachute was my go-to prop for tossing stuff together.)
Challenges
Here are the three Phases/Challenges I like to present (and if you are near basketball hoops, there is another challenge):
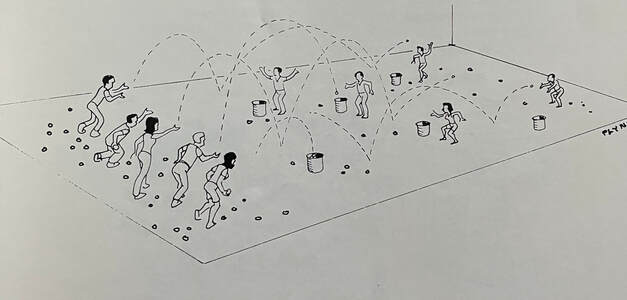
Phase 1: Toss Up - Each group/tarp in play is challenged to toss up their object approximately ten feet into the air and then catch it in their tarp. You (the facilitator) can be the judge of height or hold each group accountable for 'height validation' - was it high enough or not? After some practice, try the 2-minute challenge: How many catches can each group get in the two minutes? (Maybe, each group sets a goal prior to the attempt. How about a second attempt to improve on the score?) BONUS Challenge: If you have a basketball court at your disposal, try to 'Toss Up' into the basket.
Phase 2: This challenge needs at least two tarp groups. Start out with one tossable for every two groups. After getting practice with 'Toss Up' (above), the two groups will toss back-and-forth to each other. The tossable must go at least 10-feet high, ultimately being caught by the tarp group that did not toss the tossable. After some problem solving and practice, try the 2-minute challenge: How many catches in two minutes? (Maybe a second round after some first-round problem solving to improve the score.) NOTE: If you need to form a group of three, position the tarp groups in a triangle formation. BONUS Challenge: Give each tarp group a tossable and challenge pairs (or a group of three) to toss and catch simultaneously.
Phase 3: When there is time (and still some Tarp Tossing energy), present this single group challenge. Tarp groups are tasked to 1) toss up their object, 2) turn their tarp over 180 degrees, and 3) catch their object in their tarp. This challenge takes a bit more time to work out the 'problems' that arise and get "on the same page." The 2-minute challenge for this one: How many catches 'in a row' can be made? That's, toss-turn-catch.
During this third Phase, I have the groups discuss, plan and practice for a while in order to build competencies. Then, we take some time for each group to share how they are approaching the challenge - one tarp group at a time shows everyone else. Then, groups get back to practicing. This part is brought up later in the processing session to see if groups had any influence on another group's process. What is the 'best' way? Is there a best way? What factors influence the best way? Who won?
After a bit more practice we move into the 2-minute challenge - catches in a row. Again, I always like to provide a process improvement opportunity after the first attempt.
I finally got some video of my go-to Tarp Tossing sequence. It's part of a 2-hour curriculum I wrote focusing on cooperation. (Cooperation processing ideas below.)
Needs & Numbers: I use 6 by 8-foot medium duty plastic tarps - a good price range and they hold up well. If you can afford it, get the heavy duty plastic tarps or canvas drop cloths. (SAFETY WARNING: Be careful around the metal grommets found on most plastic tarps - don't let fingers get into the holes. I like to roll/fold up the edges a couple times [2 rolls only] to cover the grommets - this also provides for a better grip on the tarp.)
You'll also need a safe tossable object. I use a slightly deflated playground-type ball (those dollar store inflatable ones work well). I deflate them enough so if the catch is missed the ball does not go (roll or bounce) very far from the group.
Tossing works well with 4 to 8 players per tarp, middle school ages and older. (NOTE: When I worked with elementary ages the parachute was my go-to prop for tossing stuff together.)
Challenges
Here are the three Phases/Challenges I like to present (and if you are near basketball hoops, there is another challenge):
Phase 1: Toss Up - Each group/tarp in play is challenged to toss up their object approximately ten feet into the air and then catch it in their tarp. You (the facilitator) can be the judge of height or hold each group accountable for 'height validation' - was it high enough or not? After some practice, try the 2-minute challenge: How many catches can each group get in the two minutes? (Maybe, each group sets a goal prior to the attempt. How about a second attempt to improve on the score?) BONUS Challenge: If you have a basketball court at your disposal, try to 'Toss Up' into the basket.
Phase 2: This challenge needs at least two tarp groups. Start out with one tossable for every two groups. After getting practice with 'Toss Up' (above), the two groups will toss back-and-forth to each other. The tossable must go at least 10-feet high, ultimately being caught by the tarp group that did not toss the tossable. After some problem solving and practice, try the 2-minute challenge: How many catches in two minutes? (Maybe a second round after some first-round problem solving to improve the score.) NOTE: If you need to form a group of three, position the tarp groups in a triangle formation. BONUS Challenge: Give each tarp group a tossable and challenge pairs (or a group of three) to toss and catch simultaneously.
Phase 3: When there is time (and still some Tarp Tossing energy), present this single group challenge. Tarp groups are tasked to 1) toss up their object, 2) turn their tarp over 180 degrees, and 3) catch their object in their tarp. This challenge takes a bit more time to work out the 'problems' that arise and get "on the same page." The 2-minute challenge for this one: How many catches 'in a row' can be made? That's, toss-turn-catch.
During this third Phase, I have the groups discuss, plan and practice for a while in order to build competencies. Then, we take some time for each group to share how they are approaching the challenge - one tarp group at a time shows everyone else. Then, groups get back to practicing. This part is brought up later in the processing session to see if groups had any influence on another group's process. What is the 'best' way? Is there a best way? What factors influence the best way? Who won?
After a bit more practice we move into the 2-minute challenge - catches in a row. Again, I always like to provide a process improvement opportunity after the first attempt.
Processing Tarp Tossing focusing on Cooperation
This is the first question I like to ask:
We put everyone's ideas together to form the group's understanding of cooperation. (Basically, cooperating to define cooperation.)
As an example, I asked ChatGPT (AI) to provide "a short definition of cooperation."
Response:
Cooperation refers to the act of individuals, groups, or entities working together towards a common goal or objective. It involves collaboration, mutual assistance, and joint efforts to achieve outcomes that benefit all participants involved. Cooperation often entails sharing resources, information, skills, or responsibilities to maximize efficiency and effectiveness. It is characterized by the willingness to compromise, communicate, and coordinate actions for the greater good, fostering harmony and positive interdependence among participants.
Many of the concepts I've bolded above are brought up by group members forming their definition. I then pick a few of the concepts to explore depending on the overall outcomes the group is working towards:
This is the first question I like to ask:
- How do you all define cooperation?
We put everyone's ideas together to form the group's understanding of cooperation. (Basically, cooperating to define cooperation.)
As an example, I asked ChatGPT (AI) to provide "a short definition of cooperation."
Response:
Cooperation refers to the act of individuals, groups, or entities working together towards a common goal or objective. It involves collaboration, mutual assistance, and joint efforts to achieve outcomes that benefit all participants involved. Cooperation often entails sharing resources, information, skills, or responsibilities to maximize efficiency and effectiveness. It is characterized by the willingness to compromise, communicate, and coordinate actions for the greater good, fostering harmony and positive interdependence among participants.
Many of the concepts I've bolded above are brought up by group members forming their definition. I then pick a few of the concepts to explore depending on the overall outcomes the group is working towards:
- What did "working together" look and sound like for you in your group? What did you enjoy about working together with your group? How could you be better at working together?
- What 'common goals' did you work on together during the challenges? What goals were imposted by someone else and which ones were generated by you? Which goals did you reach or exceed? How do you feel about your successes and your failures to achieve the goals? What is difficult about setting goals? How do goals help us?
- Think back on how you 'communicated' with each other - what are your thoughts about the way your group communicated? What went well? What could be better? Share examples of the ways you would like others to communicate with you. What barriers prevent good communication? How can we eliminate these barriers?
- What is the 'greater good' for you all right now? What does this mean to you? Why is it important to you?
- What does 'positive interdependence' look like to you right now? What is important about this concept?
Tarp Tossing is easy to set up, fun to experience and rich with take-aways. The cooperation focus is simply one direction you can take the discussion.
Let us know where it takes you!
All the best,
Chris Cavert, Ed.D.
Let us know where it takes you!
All the best,
Chris Cavert, Ed.D.


 RSS Feed