FUNdoing - Activities for Team Builders
  • FUNdoing
  • About
  • Blog
  • Resources
  • Books
  • Trainings
  • Ricochet
  • Contact
  • Store

Dixit Cards Repurposed

11/17/2016

0 Comments

 
Picture

Those of you who know a little about me, understand I really like the Chiji Cards - if you don't know, I wrote The Chiji Guidebook with Steve Simpson several years back that includes a couple dozen activities you can lead using the cards. (If you want to know a bit more about the cards, HERES a recent post.) But, I do love "cards" of all sorts. 
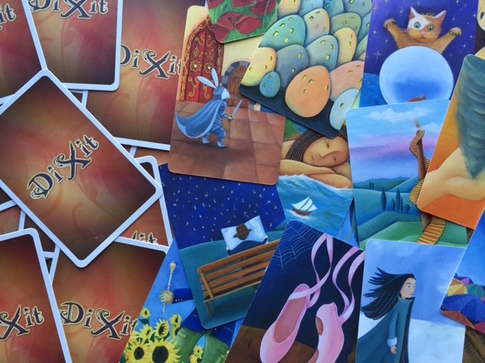
I first saw the Dixit cards when I was in Taiwan years ago, but I didn't connect with them until recently (when the game was on sale at Amazon!) Dixit is a board game that (loosely) plays like Apples to Apples (if you know that one). The game is pretty cool, but I'm all about the cards.
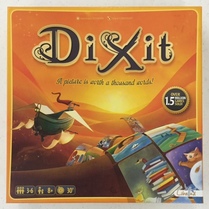
(The picture to the right is the most recent box cover design for the board game.) 
Picture
There are 84 cards in the game measuring about 3.5 by 6 inches. The pictures are very interesting combinations of colors and images that make you look twice in order to determine what it is you are actually looking at. Let me share a few ways I've used the cards recently: 
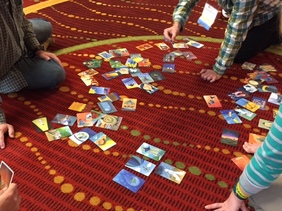
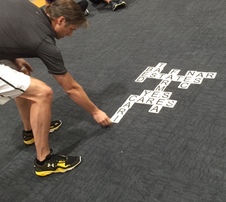
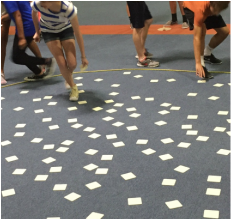
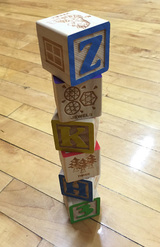
The Story of Your Experience I pulled the cards out to share with some friends at the post-conference at the most recent AEE gathering. We came up with the idea to use the cards to tell the story of our collective conference journey, starting from when we left our homes up to how we got to be sitting were you were at that moment.. We scattered the cards out on the floor (a very appropriate carpet for the experience I would add) and started placing them in a "layered" sequential story line. It was a really nice way (in my opinion) to reflect on a sequence of events. We talked about our journeys over the previous four days, but I'm sure it would work just was well to talk about a two or three hour program. 
Picture
Picture

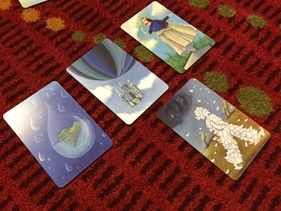
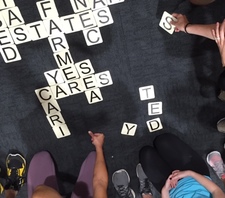
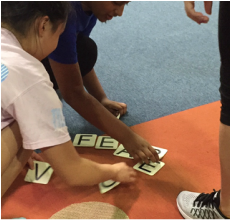
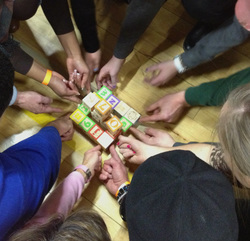
Describe Your Group Recently I used the cards to find out more about the group I was working with. I scattered all of the cards across two different tables. I asked my group (of 15 people) to work together to choose 6 to 10 cards that would tell me something about them. In they end they chose 6 cards that told me they liked challenges, they were strategic problem solvers, they trusted each other to help out, and they were embarking  on a new project and, most likely, it was going to take a rainbow and a horse to get them there (you'll know the card when you see it). It was really fun to hear them tell me about themselves through the pictures.  

Tell Me a Story One of the most obvious activities for these cards is to create stories. This was one of the first things I tried with a group of individuals involved in a treatment program. After the cards were shuffled around, each person ended up with a card they did not choose to pick up - I considered this a random selection. Then, the participants got into groups of 4 and created a story together using the cards as prompts and visual aids. Then, every group decided to share their story with everyone else (something I did not think they would want to do - I just wanted everyone to create something with his/her small group). The results were simply wonderful. Some of the stories were about their collective treatment journeys (like The Story of Your Experience above) and some were mystical fantasies. My point of the activity was to get them to "think on their feet - be creative" - wonderful results.

If you pick up a set of these cards, let me know how they work for you. Leave me a comment below!

All the best to you out there! Have FUN!

​Chris Cavert, Ed.D.

P.S. If you search around for Dixit, you will also find out there are a number of expansion packs available as well. You could end up with 100s of choices - maybe there would be themes to put together as a set or maybe emotions that are apparent in the cards that could be explored. Keep me posted!!  
0 Comments

3 Down (with Letter Tiles)

9/6/2016

0 Comments

 
In December of 2015 I posted my first Jumbo Bananagrams activity - Word Building. These big flexible vinyl letters are simply great for tons of FUN. (As of this update - 3/6/22 - Jumbo Bananagrams are no longer available. You can make your own letter tiles using large index cards cut in half, or check out the Crowd Words letter tiles available from Training Wheels.) As you can see, the photos in this post include Bananagrams. (Maybe they will make a comeback!!??) 
Recently I made up this team building word game - 3 Down - using jumbo letters that, I believe, has some great potential. I've only tried it a couple of times so I could use some help working out the details. Here's what I have up to now:
Set Up
Lay out all the letters, facing up, on a couple of tables (see first picture) or on the floor – this will be the “pool” of letters. Leave enough room in the activity area for the “words board” – where the words are built. The words board could be a couple of rectangular tables placed together to form a large square or simply play the words on the floor near the pool of letters (see second picture). 
So far I have played 3 Down with groups of 6 & 14 participants divided into pairs. (If there is an odd number of players have someone in each round be without a partner - this single player could be a different person during each round or keep the same person. It will depend on the outcomes you, and the group, are working towards.)
​

Pick Letters
Here's my thinking as I look ahead to playing more of 3 Down. If you have 6 to 8 participants in your group have each player take four letters from the pool. Then, add another Round (6) to provide more opportunity to play letters (see more details below).


If you have 10 to 14 participants, each player takes three letters.
Picture
Picture
Picture
Procedure 
Explain the objective of the activity before each participant picks up three (or four) letters from the pool.

Objective
Each participant in the group is challenged to place all of his/her letters down into a word puzzle by or before the fifth (or sixth) round of play. Each letter tile is required to be part of a word.

By the end of the final Round, the word puzzle will have a "scrabble-like" configuration. Letters are spelled left to right or top to bottom (see the second and third pictures) orientated to the designates 'top' of the puzzle - only one top may exist. All words in the puzzle must be connected to at least one other word when the puzzle is complete. Like Scrabble, all letters (in the end) must be part of one or more words. In other words, all tiles connected to each other must form a searchable word.
 
Pair up your participants (either in some sort of creative way or purposeful pairing).

NOTE: I designed this activity before working with a "couples" groups - couples that have been married for less than a year. They were lead by a mentor couple that had been married for 11 years. Lots of great talking points about "marriage" bubbled to the surface.

All participants will be standing (or sitting) together in a circle formation. Each participant is required to be standing next to his/her designated partner. When the circle pairing is set, have everyone go over to the pool of letters to pick up what they want (without discussion their choices with anyone) and then return to the circle formation (each player standing next to his/her partner). You might consider setting a time limit for picking up letters? 


The game is played in a series of Rounds - five or six (as noted above) depending on the number of letters you allow everyone to pick up (the more letters the more rounds). In each Round each participant/player gets one turn to make one of the Possible Moves (even if he/she is not holding a letter). 

Overall Round Rules:
  • Participants can ONLY do the things stated in each round.  
  • Each participant can only make ONE of the Possible Moves listed in each round.
  • Participants may not change places with ANYONE in the circle unless otherwise stated in the Round Rules.
  • When a letter is placed into the word puzzle it must be touching another letter (at the corner or along a side) in the puzzle – a letter cannot be “floating” by itself on the word board.
  • After the Round Rules are explained the time, designated for each round, will start. Rollover minutes will/can apply (you decide) – what is not use in one round will/can be added to the next round.

Validating Words:
Words will "grow" as players take turns adding letters. You'll need to decide how you will evaluate valid words. If you are a "Scrabbler" you can play by Scrabble rules - you may need to explain these to your group. You could also make up your own guidelines for valid words. I use a the smartphone app WordBook. I tell my group, "If I can find the words you create on my app they will count as valid words." (NOTE: One of the two groups so far did ask me during play if certain words would be valid - they used me, and the app, as a resource during their process. Good stuff!)


ROUND RULES
 
Round 1
(5 minutes)
  • You and your partner are the only ones who can see/know what letters you are holding.
 
Possible Moves
  • Put down one letter.
  • Pass. (Do nothing.)
 
Round 2 (10 minutes)
  • Before anyone plays a letter in this round anyone can exchange one of the letters they are holding for a letter in the pool.
  • You and your partner are the only ones who can see/know what letters you are holding.
 
Possible Moves
  • Put down one letter.
  • Pass. (Do nothing.)
 
Round 3 (10 minutes)
  • Before anyone plays a letter in this round one person from each pair can exchange one of the letters he/she is holding for a letter in the pool.
  • You and your partner are the only ones who can see/know what letters you are holding.
 
Possible Moves
  • Put down one letter.
  • Replace one of the letters you are holding for one letter in the word puzzle (your letter goes in the place of the one you pick up).
  • Move one letter in the word puzzle to another location in the word puzzle.
  • Pass. (Do nothing.)
 
 
Round 4 (10 minutes)
  • Before anyone plays a letter in this round four people can exchange one of the letters he/she is holding for a letter in the pool.
  • You can show (and tell) your letters to anyone in the group.
 
Possible Moves
  • Put down one letter.
  • Pick up one letter from the word puzzle.
  • Replace one of the letters you are holding for one letter in the word puzzle.
  • Move one letter in the word puzzle to another location in the word puzzle.
  • Pass. (Do nothing.)
 
Round 5 (5 minutes)
  • Before anyone plays a letter in this round you can move (just once) to a new location in the circle – you don’t have to be standing next to your partner. 
  • You can show (and tell) your letters to anyone in the group.
 
Possible Moves
  • Put down one letter.
  • Move one letter in the word puzzle to another location in the word puzzle.
  • Pass. (Do nothing.)
Here's a printable copy (to the right) of the Round Rules if you want something to read from - or cut the Rules apart and hand out each set of Round Rules as needed so the group can manage the requirements.  
3downroundrules_printable.pdf
File Size: 46 kb
File Type: pdf
Download File

Observations/Questions
Here are a few observation points and related questions I've used after the two times I presented 3 Down: 
  • What did you notice about the communication during the activity as the Rounds progressed? 
  • Even though you could not share your letters with anyone other than your partner in the first few rounds, what did you do to communicate your thinking with the rest of the group? 
  • How many of you believed you could not talk with anyone else other than your partner? When did you decide you could talk to the others in the group? 
  • As the "possible moves" changed for each round, how did the activity change? 
  • When did you find the activity to be the most challenging? What were the challenges? 
  • When did you find the activity to be easier? What made it easier for you? 
  • As you all moved through the Rounds what "rules" did you create for yourself that were not actually rules of the game? (These are called phantom rules.) How did these rules effect your progress? 
  • Were you successful after the designated number of Rounds? If so, what behaviors did you notice (things you could see and hear) that were helpful to your success? If you were not successful, what prevented your success? In other words, what was done or said that prevented your potential success? 
  • What is the most important lesson you can take from this experience? 
Okay team builders, give this one a try. Ask me questions (in the Comments or send me an email) if you need clarification.

All the best, 

Chris Cavert, Ed.D. 
0 Comments

Puzzling: March 2016

3/29/2016

1 Comment

 
Here are a few puzzles to add to your collection. Or, your "Table of Torture" as Sam Sikes likes to call his collection of puzzles. Sam puts out his puzzles on a table for his participants to tackle before his program starts (the "soft" start) and during program breaks. In a programming sense, puzzles can provide another level of challenge and they also bring people together during down times (and of course they are fun to solve!). 

I've been using puzzles more and more lately with some of the (respectfully) competitive programs I've been leading for Group Dynamix (I'm one of their contract facilitators - we run Team Olympix events for groups that want a more competitive experience). Puzzles are a nice complement to the more physical challenges - reaching different learning styles or "kinds of smarts." 

Scramble Cards This Puzzling post was inspired by my last post - Name Card Scramble. After saving the cards from a few programs I realized I had a great set of puzzle cards (some of my participants were even able to anagram their name - so cool!). On the back of each scrambled name card I wrote the "name-answer" using a yellow highlighter so it would not be easily seen through the front of the card. A group working together (or an individual) can self check their guess/answer by flipping the card over. Score each correct answer OR time how long it takes to guess all the scrambled names - add five seconds to the overall time for each incorrect answer. Here's a little list for you to work with if you want to make a quick set of (index) cards to try out (spoiler alert - answers are below): 
  1. Warned
  2. Kyceb
  3. Hrsic 
  4. Bybed
  5. Nave
  6. Krafn
  7. Riagoeg
  8. Theehar 
  9. Vani
  10. Fienjern
  11. Nivke
  12. Araul

(How long did it take you to recognize the pattern? What name were you on when it clicked?)
(Answers: 1. Andrew, 2. Becky, 3. Chris, 4. Debby, 5. Evan, 6. Frank, 7. Georgia, 8. Heather, 9. Ivan, 10. Jennifer, 11. Kevin, 12. Laura) 

Picture
The "T" Puzzle If you are a Tangram fan (and haven't seen this one), you'll like the T. It's easy to make (paper or wood) but tricky to solve. And, like Tangrams, you can create a bunch of other shapes/images with the pieces. I like to give points (e.g., 50) to my groups for solving the "T" and then (e.g., 10) points for each of the shapes they can solve from the (self-scored) handout I provide. Here's a GREAT PDF from WoodPuzzles.com that includes a nice handout. (If you search "T Puzzle" in Google Images there are a few patterns you can download for cutting assistance.) 

Word Games and Puzzles by Joan Acosta (from bestofthereader.ca). I've been getting some great milage from this PDF BOOK. Easy to print and laminate the pages. Provide  some small tipped dry-erase markers so participants can write in answers on the page - self score or make a quick check before giving a score. Wipe off the answers from the pages so you can reuse the puzzles for another program. 

Have fun out there!

​Chris Cavert, Ed.D.

What are you favorite puzzles? Share in the comments below.....
1 Comment

Word Building with Jumbo Bananagrams

12/30/2015

0 Comments

 
Recently I posted my Top 10 Go To Activities and I included a description of Four-of-a-Kind - my portable discovery for Word Building written up in the book 50 More Ways to Use Your Noodle. Well, say hello to JUMBO Bananagrams!! If you don't know about bananagrams its a table-top word game - like Scrabble but without the board (sort of). The original small version has been out for years and now there is a set with pieces 3 by 3 inches made of flexible rubber (in a handy bag). So, waterproof and durable. Just great for adventurers like us!! Find your Jumbo set on Amazon.com 
Picture
Now Word Building can be more portable (don't get me wrong, I love to use my 3.5 inch diameter lettered noodle chips every chance I get - but sometimes I can't get them to where I'm going). 

Word Building
Set Up: Use a 50 foot activity rope and lay out a big circle. Scatter the JUMBO letters, face down, inside the big circle (see picture). Then, set down one game spot (or Hula Hoop, or carpet square) for every small group of 2 to 3 players about 5 feet from the outside of the rope circle. You're ready to go! 
Picture
To make the team building more interesting, you'll want at least six small groups of 2 or 3 players each. So, this one works well with 12 to 24 participants (in my experience) with one set of Big Bananagrams. Put a small team at each of the game spots you've placed around the outside of the rope circle. And tell everyone The Objective of the activity is for each team to spell of five-letter word (or you could play a round of four-letter words first) using the lettered pieces inside the large rope circle.
Picture
RULES of PLAY
This is a timed activity. When you say "GO" the following rules are in play until every small team has a five-letter word. The "group" is after completing the objective in the lowest possible time.
  • Only one player from each team can enter into the circle of letters at a time (i.e., if there are six teams, up to six people can be in the circle).
  • After entering the circle you are only allowed to pickup/touch one letter piece. 
  • If you choose to take this piece from the circle you and your small group "teammates" may not look at the letter until it is flipped over onto the team spot/carpet square. [NOTE: Nothing was said in this rule about someone else in the group seeing the letter piece once it is picked up inside the circle - this is often discovered as a "helpful" behavior after a few rounds of play.]
  • All players on each small team must take turns going into the letter circle - meaning, all players from a small team must go into the circle once before someone can go in a second time and so forth. 
  • If your small team decides to keep the letter taken from the circle it is placed down on the floor/ground and must be touching the spot or be touching a letter that's touching the spot.
  • If your team decides NOT to keep a letter it is brought back into the circle and placed face/letter down inside the circle. In other words, if you don't want a letter it goes back into the circle. This means you may not hand a letter that you have to another team.  
  • Each small team may only have up to six letters at their spot - when the seventh letter is brought to a teams spot one must then be taken back to the circle on the next players turn.

Remember, the objective is for EVERY small team to spell out a five-letter word. This means the activity is not over - the time does not stop - until all small teams have a word.

This is one of my favorites (could be my favorite) because of the "helping" and planning behaviors that can show up. What do the plays of a small team do when they have spelled their word? Usually, at first, they end up sitting around until everyone else gets done. When you play several rounds for time someone usually figures out they are able to help other teams still playing within the rules. For example, a player can get a letter, bring it back to their spot, look at it, then the next player from the team can call out what the letter is as she puts it back (face) down in the circle. Or, players could go around to other teams to see what they need and then go into the circle and work to find it. In most cases I've seen the entire group eventually work together from the start (after two or three rounds) and plan where they will discard the letters so others know where to look. Lots of possibilities! (There are a few more details about this process written in Four-of-a-Kind - follow My Top 10 link above.) 

AND, there is so much more team building to be done with letter pieces! DOUBLE AND, the game Bananagrams itself is great fun. Play by the official rules with small teams of 2 or 3 - when "Take" is called, someone from each team runs to the center pile for a letter (or two, depending how you play). For those in the know: Can we say COMMON CORE team building?!

Let me know how it's going out there. Leave me your thoughts in the comments below. 

Have FUN!

​Chris Cavert

0 Comments

Rasta Ball: Makin' It

8/24/2015

0 Comments

 
What came first, the Comet Ball or the Foxtail? I'm not quite sure about the answer, but in the 1984 edition of Silver Bullets from Karl Rohnke he showed us how to make a Comet Ball out of an old nylon and a tennis ball - oh the fun! Then, as evolution would have it, in one of the Volumes of FUNN Stuff Karl made the "Rasta/Comet Ball Comparison" (now in FUNN 'N GAMES, 2004) and taught us how to make the Rasta Ball (RB). I'd like to share a step-by-step build of the RB with you here to keep the fun alive. So, break out the old tennis balls and grab a few things from the hardware store. Here we go... 
NEEDS: 
  • 3/8 inch Hollow-Braided Poly Rope (50' bag shown).
  • 1 Tube of Clear Silicone (2.8 oz. good for 12, or so, RBs)
  • Electrical Tape (color does not matter)
  • Tennis Balls (old or new, does not matter)
  • Scissors
  • Box Cutter or Sharp Knife
  • Black Sharpie
Picture

PREPARATION: 
  • Cut (with scissors or knife) 2 1/2 to 3 feet of the nylon rope
  • Tie an overhand knot about two inches from one end.
  • Wrap some electrical tape off the other end anywhere from 6 to 9 inches from the end (more details in next step). 
  • Draw a two-inch line with a sharpie on the ball - avoid the rubber seam on the tennis ball. 
Picture

MAKING THE TAIL: 
You have a choice to make before unraveling the tail of your RB. Basically, the more you unravel the slower the RB will go - translation, the less distance it will travel. You'll want to unravel at least a few inches to give your RB a fair "tail" for directional purposes. After that, it's up to you. So, before unraveling, wrap your electrical tape at the point you want to stop unraveling, then unravel-away. (You can alway remove the tape and unravel more, but not the other way round.)
Picture

CUTTING: 
Carefully (please), cut along the line you drew on the tennis ball with a (new blade!) box cutter or really sharp knife (I suggest you wear a leather glove on the hand holding the tennis ball). This is not as easy as one might think, so be CAREFUL! A two-inch cut is just about right for the knot at the end of rope. However, you may need to cut the opening a little bit more if you find yourself using profane language while attempting insertion.  
Picture

INSERTION: 
While squeezing the sides of the tennis ball near the edges of your cut, use the other hand to push/manipulate the knot of the rope into the opening. Note: Newer tennis balls are more forgiving than older ones. In my experience, older tennis balls are more susceptible to cracking at the ends of the cut (dried out material). If the opening becomes to big it's more difficult to seal it - you decide if you want to try and save a cracked one or not. 
Picture

SEAL IT: 
  • Open up your silicone tube and follow the directions for preparing the top. 
  • Squeeze silicone in and around the opening of the cut. 
  • Be sure to move the rope around a bit to get silicone in and around the rope area. 
  • Let your creation dry (read the tube for drying time). 
And......
Picture

Tah-Dah...a Rasta Ball is born!

PLAY: 
  • Rasta Lawn Darts
  • Pasta Golf - into containers or hit an object
  • Rasta Bocci 
  • Ultimate Rasta (tail catch for score)

I've included a little video below of one possible (there are others) tossing procedure (if you have yet to see one of these props in action).
Picture


Do let me know what fun you have with your Rastas - long live the RASTA!!

Have Fun Out There!

Chris Cavert
0 Comments

Lotsa Blocks

4/12/2015

1 Comment

 
Picture
A couple of yeas ago now I went to a workshop presentation by Nate Folan, the author of the activity book The Hundredth Monkey. A great time was had by all to say the least. My favorite discovery from Nate's workshop was his use of wooden building blocks. Needless to say I went out right away to get my own set and I've been using them a lot over the past couple of years. 

Throughout the book the block activities are presented separately, but Nate showed us a sequence of activities that I tend to stick with and have added to. I want to share my additions here and, with respect, mention Nate's gems in hopes to entice you enough to pick up his book (BTW - My new activity book is now available. Find it on Amazon.) 

Needs: A set of 2 inch wooden building blocks (I picked up a set of 48 at Walmart in the baby toys section). You will want at least one block per participant and more if you want to build sculptures. (Note: There are smaller block sets available, I think they are an inch and a half. Smaller blocks make most of the activities a bit more challenging.)

Mix-and-Mingle (my addition): Every player picks up a block then walks around to find out the commonalities s/he has with other player's blocks. Be sure to learn player's names in the process.

Connection (my addition): Players exchange blocks for a while until you say "STOP" then find something they connect with on the block they have in hand (e.g., favorite color, special toy, a word that reminds them of a good memory). Then, players go around sharing their connect with others. If you want, have players exchange blocks after a share. Players then have to find a connection to the new block, then share.  

Ice-Cube Dance (Nate's): Players press one or two blocks together, each using one index finger. Pairs then explore how to move around each other and the playing space without dropping the block(s). 

Ice-Cube Tag (Nate's): Pressing two blocks between an index finger, pairs move around the area trying to dislodge other players' blocks using only the free index finger available. After a drop players re-set, or find a new partner to play with, and then re-enter the game. 

Block Sculpture (Nate's): Groups of 6 to 8 players get together and build a three-dimensional sculpture with the blocks they are given (2 to 3 blocks per person). Once the sculpture is built the group attempts to raise it up, only using index fingers, as high as they can and then lower it back down without dropping any blocks (see first picture above).

Picture
Skyscraper (my addition): Using one block per player a group of 5 to 8 people make a single stack of blocks then try to turn it over 180 degrees and set it back down without dropping any blocks. Using the picture to the left as an example, the "Z" block would be at the bottom of the stack and the "3" block would be at the top after the group turns the stack over. 

What else can you do with wooden building blocks? Share your ideas below in the comments. 

Have fun out there!

Chris Cavert

1 Comment

Playground Team Building 

12/17/2013

0 Comments

 
Picture
I'm fairly certain I'm not the only one who has use playground equipment for team building activities. Recently I helped a friend come up with over a dozen activities utilizing the public playground structure near his inner-city school. Teaching in a big city often comes with limited outdoor space, but local parks can serve as a useful alternative to staying inside on those beautiful days. Here's a brief summary of some of the ideas we put together. (All these ideas come with the blanket understanding that proper safety precautions will always be covered and followed - be super sure that structures are safe before you use them. If in doubt, don't do it!!): 

Sherpa (Trust) Walk: Two group members lead a small group of un-sighted players safely around/up/over different areas of the equipment. (The sherpas, in Rohnke-esk fashion, do not speak a known language. They communicate in sounds that the group must eventually figure out. The safe easy Walk is to use a language that works for everyone - or mostly everyone.)

All Aboard: There are always a wide variety of platform spaces for the group to occupy. Start out with a large platform area and ask everyone to stand on it together (be sure the structure you are using is strong enough for the entire group). The idea is to eventually find the smallest (safe) platform area that everyone in the group can stand/balance upon from at least three full seconds.

Stepping Stones: One of my favorites for the playground. I bring along my 1-foot round spot markers, each player gets a spot, and the group has to use them to step on in order to get from one side of the playground structure to the other. So, if a player is stepping down a spot must be under his or her foot. I love the three-dimensional aspect of the trip. (And, going through a tube is really interesting! Or up a slide??!!)

TP Shuffle: Using an elevated curb, beam, or even some chalk on the side walk for the path, two small groups facing each other (each group in a line) have to switch places without stepping off the curb, beam, or chalked path. (I always like to start with a sidewalk version and then progress to a more elevated challenge.)

Tunnel Pass: Divide a group in half - one half at each entrance to the playground tunnel. Players can only go through and exit the tunnel if they have passed someone inside of it. Get everyone from both sides through the tube. (Careful with this one - there are some space body contact issues in there. The right group at the right time.)

Spider Web: There are lots of openings on playground equipment. After going through a progression of spotting and lifting activities set up a plan for everyone to go through some sort of opening in the equipment. Lots of room for planning and discussion. You could also assign points for the different openings and the group does it's best to get the most points possible. 

Up and Over: Like a team wall, groups can also work together to get everyone up-and-over a stable bar located on the playground. The bar should be at a height where everyone will be able to spot others safely while maneuvering over the top. Spotting! Spotting! Spotting!

Other Playground Team Building ideas out there. Share in the comments below!

All the best, 

Chris Cavert

0 Comments

Traffic Light Color Cards

9/22/2013

2 Comments

 
Picture
My good friend Brian designed a wonderful pre-breif and debriefing tool some years back called the Stop-N-Go. This handy portable processing tools is available at the Training Wheels website. A Green, Yellow, and Red marble travel safely in a perforated PVC key chain style tube always at the ready to use with groups. I have one and use it all the time. Which brings me to a slight variation on Brian's idea. 

The other day I was walking around one of my favorite activity  idea spaces - Lowe's. I've always been attracted to the paint sample cards but have never been inspired to use them due to their size (a bit too small). However, now available are 4 inch by 6 inch paint sample cards for allen + roth's valsper paints. I immediately thought of how to use them. 

With Brian's idea of the traffic light colors I can now write down the goals participants have for each color when I'm in an environment to do so. "What do we want to GO for during the program?" I write this on the green card. "What do we want to be CAUTIOUS of?" on the yellow card. And, "What do we want to make sure we STOP doing while we are together? on the red card. I'm sure you see the idea here and the many instances you could interject this line of thinking throughout your programs. 

When I'm using the colored marbles I start out asking for one thing related to each color - making it easy to remember and evaluate. Then, as the program progresses we can check in with the marbles from time-to-time to see how we are doing. If it's appropriate we add a consideration to each color. We could even determine that what was decided earlier is no longer relevant so we replace the initial consideration with another one that seems more relevant to what's going on. I see this process happening with the colorful cards as well. Starting with one item and then adding to (writing on) the cards as we progress. We can even cross out things that no longer apply. I like the visual aspect of the cards and seeing the considerations in print. There is still a limit to the amount that will fit on a card, but often times less is more. 

Also, just getting my hands on these colorful cards made me realize I could also pick up some green, yellow, and red card stock paper and cut out my own cards. Then there is a front and back side to write on. And, I cold give these cards away to the group at the end of their program to remind them of what they worked on. (I find it interesting what opens a door to an obvious resource.)

What else can we use paint sample cards for? Share your ideas in the comment area below. 

All the best, 

Chris Cavert

2 Comments

Rhyming Words Repurposed

8/25/2013

0 Comments

 
Picture
I attended the first annual Xperiential Symposium this month here in Chicago. Good people and good learning!! My friend and fellow experiential educator Barney Straus share a nice "repurpose" of a puzzle game for kids called Rhyming Words. He says he picked this up at Target. The game includes 50 sturdy puzzle pieces - enough for up to 25 puzzle pairs (but you knew that!). It sells for about $15 on Amazon. 

Activity 1: The first activity he introduced involved each participant in the group finding his or her rhyming pair. Barney first gathered from the box the number of puzzle pieces we needed so each of us, with one piece, would have a rhyming match. He shuffled up the pieces and then we each picked one from the pile (if you have an odd number of players, then you, the facilitator, get to play). On "GO" we turned our card over and then mingled around until we found our match. After pairing up we introduced ourselves and shared some facts about each other - a nice way to connect with someone else in a safe way. And a great way to pair up participants randomly. 

Picture
Activity 2: Barney then asked all the pairs to come up with a sentence that included the two words they have and a strategy as to how each pair would present their sentence to the group. There was a nice variety of presentation styles. This was a nice easy challenge for two people and a low-level risk of presenting "ourselves" in front of a group. 

Activity 3: Being the experiential educators that we are, we proceeded to check out all the cards and found that we could create a fair number of "word lines" - think Word Circle Puzzles without connecting the words into a circle. House Cat & Fire Truck are two starts I remember....

Activity 4: We also noticed that the puzzle images could be used as a frontloading or processing tool. "Choose an image that best represents......" Like a TIRE, we want to make sure we keep rolling and recognize when we're stuck. We should remember to keep the FIRE burning for what we think is important. Lets be sure to acknowledge the things that can BUG us and figure out strategies to work through these things. We will likely have to wear different HATS during our time together - some of these hats are.... 

I'm sure there will be more fun pulled out of this versatile game. If you try it out pass along any new ideas through the comments below. 

All the best, 

Chris Cavert

0 Comments

Pictionary Card Game Processing

8/6/2013

0 Comments

 
Picture
I finally picked up the Pictionary Card Game from Barnes & Nobel. When I first saw it a while ago I thought these cards would make a nice processing tool. 

When I opened up the carton I found the game comes with two identical sets of 44 cards - a red and blue set - all for $6.95 (share a set with a friend or split your group in half so there is more talk time between participants). I was also surprised to find out the cards (printed on sturdy card stock) measure 2 inches by 2.5 inches. I actually like the idea of a tiny-tool to carry with me everywhere. And, another nice little feature is that the pictures on each card are printed on both sides so you never have to spend valuable time turning all the cards face up!! (You know what I'm talking about!!)

The cards have a variety of recognizable images (a plane, a male stick figure, a female stick figure, a house, a star, a clock, and more) and some interpretable images (three wavy lines - see carton picture, three straight lines, and some different geometric shapes). I see lots of connections through the images for meaningful processing conversations. 

These little cards can also be used for most of the activities found in the Chiji Guidebook. For example, deal everyone a pictionary card and when you say go participants are challenged to line up in order, as quickly as possible, based on the "realistic" size of the object depicted on the card. Or, line up alphabetically, as quickly as possible, by the name of the object on the card. There will be some interesting interpretations to talk about in both versions of these line ups.

And of course, you can always play the pictionary game during down time, lunch breaks, and evening recreation gatherings.  

If you try this tiny-tool, let us know how it goes. Share through the comments below. 

All the best, 

Chris Cavert

0 Comments
<<Previous
Forward>>
    Picture
    Find Out More Here

    JOIN
    FUNdoing
    Fridays
    Team Building Activities sent to your email every two weeks! 
    Picture
    FREE Processing Activity just for signing up! 

    Picture
    Processing for Beginners
    FREE Mini-Course

    Click for Information

    Some Team Building Tools at the STORE! 
    Picture


    Details & Purchase
    Picture
    Details & Purchase
    Picture
    Details & Purchase

    Blog Author

    Dr. Chris Cavert is an internationally known author, speaker, and trainer in the area of adventure-based activity programming and its relation to community and pro-social behavior development.

    Blog Purpose

    This blog is a space for hands-on programable fun - energetic activities and ideas that can be used as a means to bring people together; activities and ideas we as educators can add to our social development curriculums. 

    Categories

    All
    Activities
    A Files
    A-Files
    Challenge Course
    Chiji Cards
    CUP Activities
    Ed Tech 4 Adv Ed
    Facilitation
    Fun Props
    Lessons
    Let's Talk About
    List Play
    Noodles
    On Pedagogy
    Print N Play
    Processing
    Programming
    Puzzles
    Read This
    Repurposed
    Resources
    Small Group Activities
    Tools For Team Builders
    Top 10 Activities
    Variations
    Videos
    Virtual
    What? & Why?

    Archives

    March 2023
    February 2023
    January 2023
    May 2022
    April 2022
    March 2022
    February 2022
    January 2022
    December 2021
    November 2021
    October 2021
    September 2021
    August 2021
    July 2021
    June 2021
    May 2021
    April 2021
    March 2021
    February 2021
    January 2021
    December 2020
    November 2020
    October 2020
    September 2020
    August 2020
    July 2020
    June 2020
    May 2020
    April 2020
    March 2020
    February 2020
    January 2020
    November 2019
    October 2019
    September 2019
    August 2019
    July 2019
    June 2019
    May 2019
    April 2019
    March 2019
    February 2019
    January 2019
    December 2018
    November 2018
    October 2018
    September 2018
    August 2018
    July 2018
    June 2018
    May 2018
    April 2018
    March 2018
    February 2018
    January 2018
    December 2017
    November 2017
    September 2017
    August 2017
    July 2017
    June 2017
    May 2017
    April 2017
    March 2017
    February 2017
    January 2017
    December 2016
    November 2016
    October 2016
    September 2016
    August 2016
    July 2016
    June 2016
    May 2016
    April 2016
    March 2016
    February 2016
    December 2015
    November 2015
    October 2015
    September 2015
    August 2015
    July 2015
    May 2015
    April 2015
    March 2015
    February 2015
    January 2015
    December 2014
    November 2014
    October 2014
    September 2014
    August 2014
    July 2014
    June 2014
    May 2014
    April 2014
    March 2014
    February 2014
    January 2014
    December 2013
    November 2013
    October 2013
    September 2013
    August 2013
    July 2013
    June 2013
    May 2013
    April 2013
    March 2013
    February 2013
    January 2013
    December 2012
    November 2012
    October 2012
    September 2012
    August 2012
    July 2012
    June 2012

    RSS Feed

Proudly powered by Weebly